Netty 基础 3
Google Protobuf
编码和解码的基本介绍
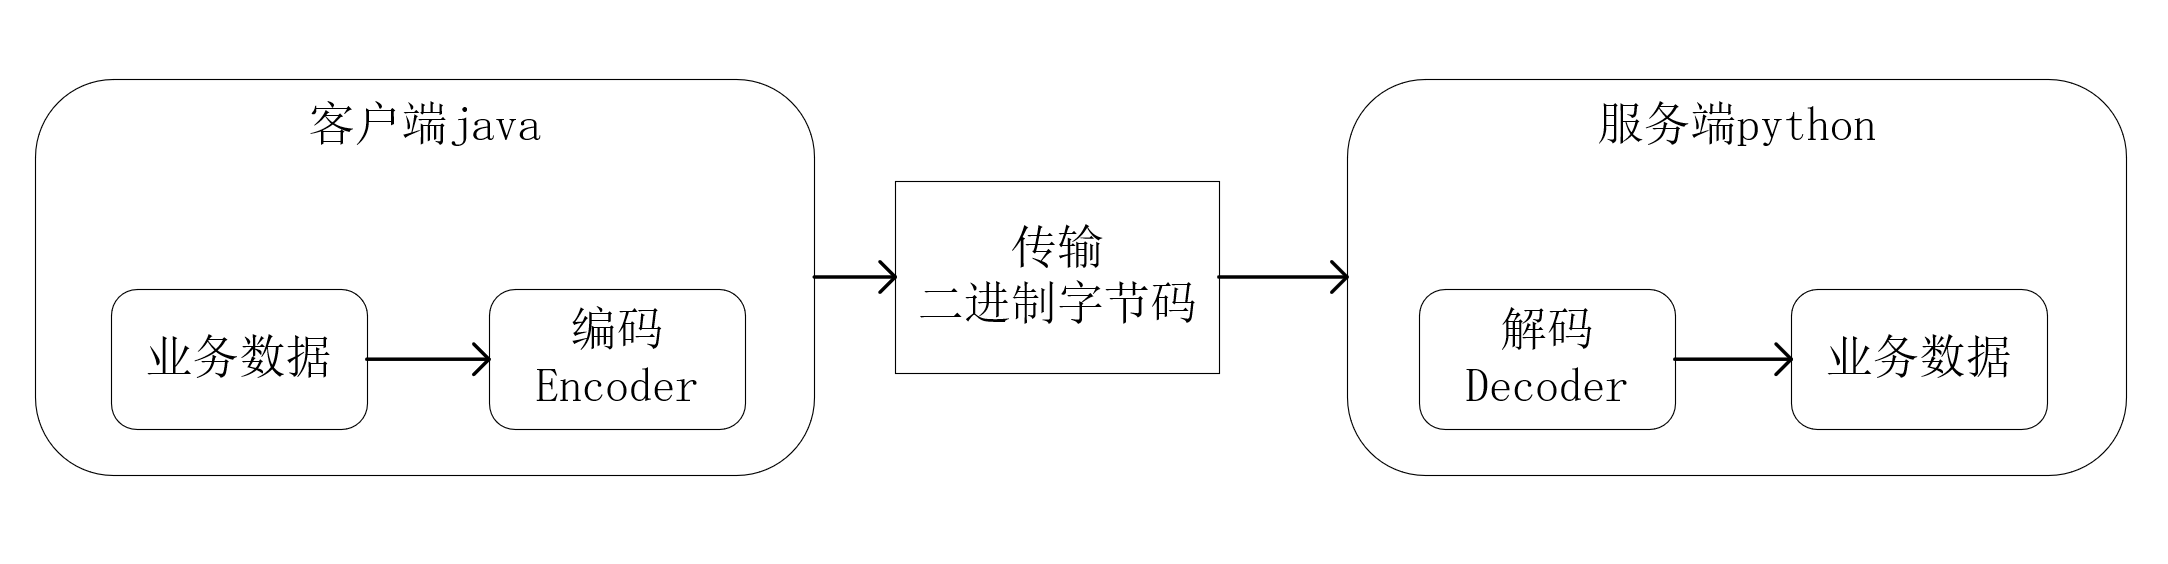
1.编写网络应用程序时,因为数据在网络中传输的都是二进制字节码数据,在发送数据时就需要编码,接收数据时就需要解码[示意图]
2.codec(编解码器)的组成部分有两个:decoder(解码器)和 encoder(编码器)。encoder 负责把业务数据转换成字节码数据,decoder 负责把字节码数据转换成业务数据
Netty 本身的编码解码的机制和问题分析
1.Netty 自身提供了一些 codec(编解码器)
2.Netty 提供的编码器
1.StringEncoder:对字符串数据进行编码。
2.ObjectEncoder:对Java对象进行编码。
3.Netty 提供的解码器
1.StringDecoder,对字符串数据进行解码
2.ObjectDecoder,对 Java 对象进行解码
4.Netty 本身自带的 ObjectDecoder 和 ObjectEncoder 可以用来实现 POJO 对象或各种业务对象的编码和解码,底层使用的仍是Java序列化技术,而Java序列化技术本身效率就不高,存在如下问题
1.无法跨语言
2.序列化后的体积太大,是二进制编码的5倍多。
3.序列化性能太低
4.引出新的解决方案[Google 的 Protobuf]
Protobuf
1.Protobuf 基本介绍和使用示意图
2.Protobuf 是 Google 发布的开源项目,全称 Google Protocol Buffers,是一种轻便高效的结构化数据存储格式,可以用于结构化数据串行化,或者说序列化。它很适合做数据存储或 RPC [远程过程调用 remote procedure call ]数据交换格式。目前很多公司 从http + json 转向tcp + protobuf,效率会更高。
3.参考文档:https://developers.google.com/protocol-buffers/docs/proto 语言指南
4.Protobuf 是以 message 的方式来管理数据的.
5.支持跨平台、跨语言,即[客户端和服务器端可以是不同的语言编写的](支持目前绝大多数语言,例如 C++、C#、Java、python 等)
6.高性能,高可靠性
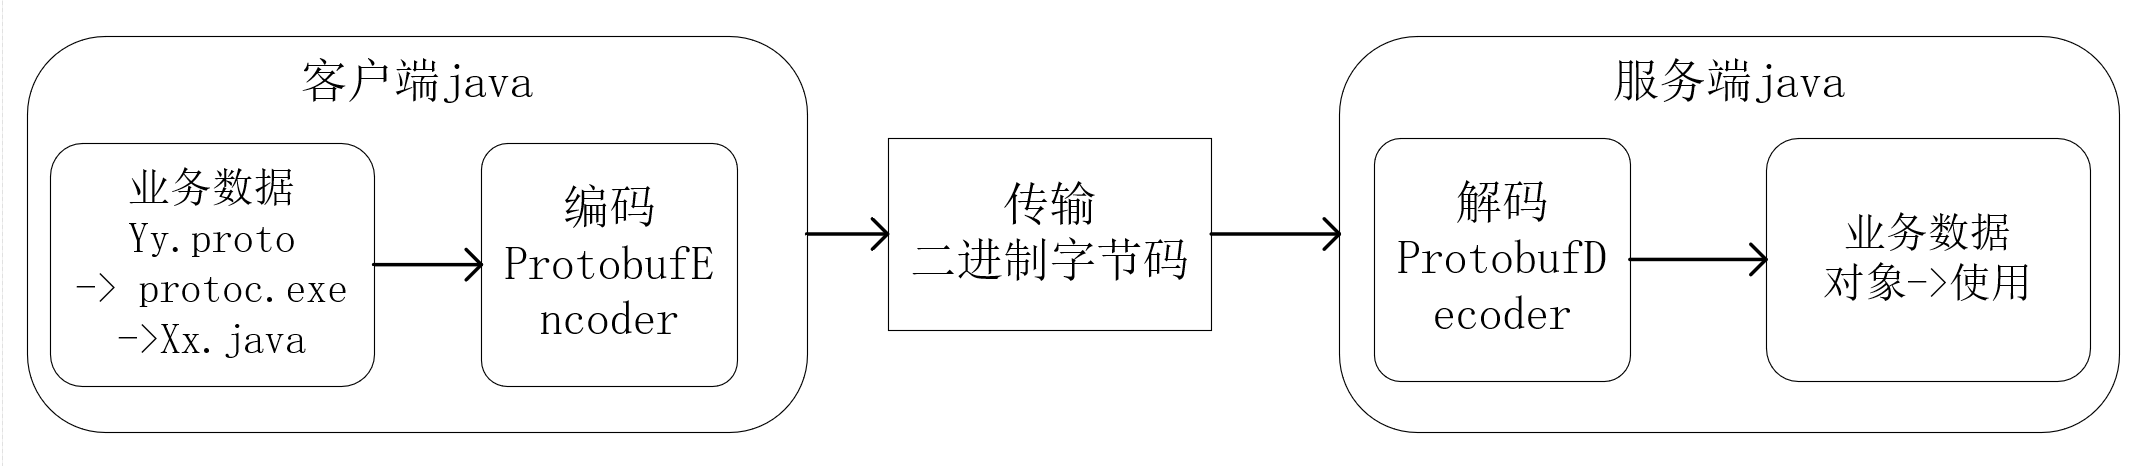
7.使用 protobuf 编译器能自动生成代码,Protobuf 是将类的定义使用 .proto 文件进行描述。说明,在 idea 中编写 .proto 文件时,会自动提示是否下载 .ptoto 编写插件.可以让语法高亮。
8.然后通过 protoc.exe 编译器根据 .proto 自动生成 .java 文件
9.protobuf 使用示意图
Protobuf 快速入门实例 1
编写程序,使用 Protobuf 完成如下功能
1.客户端可以发送一个 StudentPoJo 对象到服务器(通过 Protobuf 编码)
2.服务端能接收 StudentPoJo 对象,并显示信息(通过 Protobuf 解码)
<dependency>
   <groupId>com.google.protobuf</groupId>
   <artifactId>protobuf-java</artifactId>
   <version>3.6.1</version>
</dependency>
Student.proto
syntax = "proto3"; //版本
option java_outer_classname = "StudentPOJO";//生成的外部类名,同时也是文件名
//protobuf 使用message 管理数据
message Student { //会在 StudentPOJO 外部类生成一个内部类 Student, 他是真正发送的POJO对象
    int32 id = 1; // Student 类中有 一个属性 名字为 id 类型为int32(protobuf类型) 1表示属性序号,不是值
    string name = 2;
}
编译
protoc.exe –java_out=.Student.proto
将生成的 StudentPOJO 放入到项目使用


生成的StudentPOJO代码太长就不贴在这里了
NettyServer
package com.sevattal.netty.codec;
import io.netty.bootstrap.ServerBootstrap;
import io.netty.channel.*;
import io.netty.channel.nio.NioEventLoopGroup;
import io.netty.channel.socket.SocketChannel;
import io.netty.channel.socket.nio.NioServerSocketChannel;
import io.netty.handler.codec.protobuf.ProtobufDecoder;
public class NettyServer {
    public static void main(String[] args) throws Exception {
        //创建BossGroup 和 WorkerGroup
        //说明
        //1. 创建两个线程组 bossGroup 和 workerGroup
        //2. bossGroup 只是处理连接请求 , 真正的和客户端业务处理,会交给 workerGroup完成
        //3. 两个都是无限循环
        //4. bossGroup 和 workerGroup 含有的子线程(NioEventLoop)的个数
        //   默认实际 cpu核数 * 2
        EventLoopGroup bossGroup = new NioEventLoopGroup(1);
        EventLoopGroup workerGroup = new NioEventLoopGroup(); //8
        try {
            //创建服务器端的启动对象,配置参数
            ServerBootstrap bootstrap = new ServerBootstrap();
            //使用链式编程来进行设置
            bootstrap.group(bossGroup, workerGroup) //设置两个线程组
                    .channel(NioServerSocketChannel.class) //使用NioSocketChannel 作为服务器的通道实现
                    .option(ChannelOption.SO_BACKLOG, 128) // 设置线程队列得到连接个数
                    .childOption(ChannelOption.SO_KEEPALIVE, true) //设置保持活动连接状态
					// .handler(null) // 该 handler对应 bossGroup , childHandler 对应 workerGroup
                    .childHandler(new ChannelInitializer<SocketChannel>() {//创建一个通道初始化对象(匿名对象)
                        //给pipeline 设置处理器
                        @Override
                        protected void initChannel(SocketChannel ch) throws Exception {
                            ChannelPipeline pipeline = ch.pipeline();
                            //在pipeline加入ProtoBufDecoder
                            //指定对哪种对象进行解码
                            pipeline.addLast("decoder", new ProtobufDecoder(StudentPOJO.Student.getDefaultInstance()));
                            pipeline.addLast(new NettyServerHandler());
                        }
                    }); // 给我们的workerGroup 的 EventLoop 对应的管道设置处理器
            System.out.println(".....服务器 is ready...");
            //绑定一个端口并且同步, 生成了一个 ChannelFuture 对象
            //启动服务器(并绑定端口)
            ChannelFuture cf = bootstrap.bind(6668).sync();
            //给cf 注册监听器,监控我们关心的事件
            cf.addListener(new ChannelFutureListener() {
                @Override
                public void operationComplete(ChannelFuture future) throws Exception {
                    if (cf.isSuccess()) {
                        System.out.println("监听端口 6668 成功");
                    } else {
                        System.out.println("监听端口 6668 失败");
                    }
                }
            });
            //对关闭通道进行监听
            cf.channel().closeFuture().sync();
        }finally {
            bossGroup.shutdownGracefully();
            workerGroup.shutdownGracefully();
        }
    }
}
NettyServerHandler
package com.sevattal.netty.codec;
import io.netty.buffer.ByteBuf;
import io.netty.buffer.Unpooled;
import io.netty.channel.*;
import io.netty.util.CharsetUtil;
/*
说明
1. 我们自定义一个Handler 需要继续netty 规定好的某个HandlerAdapter(规范)
2. 这时我们自定义一个Handler , 才能称为一个handler
 */
//public class NettyServerHandler extends ChannelInboundHandlerAdapter {
public class NettyServerHandler extends SimpleChannelInboundHandler<StudentPOJO.Student> {
    //读取数据实际(这里我们可以读取客户端发送的消息)
    /*
    1. ChannelHandlerContext ctx:上下文对象, 含有 管道pipeline , 通道channel, 地址
    2. Object msg: 就是客户端发送的数据 默认Object
     */
    @Override
    public void channelRead0(ChannelHandlerContext ctx, StudentPOJO.Student msg) throws Exception {
        //读取从客户端发送的StudentPojo.Student
        System.out.println("客户端发送的数据 id=" + msg.getId() + " 名字=" + msg.getName());
    }
    //数据读取完毕
    @Override
    public void channelReadComplete(ChannelHandlerContext ctx) throws Exception {
        //writeAndFlush 是 write + flush
        //将数据写入到缓存,并刷新
        //一般讲,我们对这个发送的数据进行编码
        ctx.writeAndFlush(Unpooled.copiedBuffer("hello, 客户端~(>^ω^<)喵1", CharsetUtil.UTF_8));
    }
    //处理异常, 一般是需要关闭通道
    @Override
    public void exceptionCaught(ChannelHandlerContext ctx, Throwable cause) throws Exception {
        ctx.close();
    }
}
NettyClient
package com.sevatal.netty.codec;
import io.netty.bootstrap.Bootstrap;
import io.netty.channel.ChannelFuture;
import io.netty.channel.ChannelInitializer;
import io.netty.channel.ChannelPipeline;
import io.netty.channel.EventLoopGroup;
import io.netty.channel.nio.NioEventLoopGroup;
import io.netty.channel.socket.SocketChannel;
import io.netty.channel.socket.nio.NioSocketChannel;
import io.netty.handler.codec.protobuf.ProtobufEncoder;
public class NettyClient {
    public static void main(String[] args) throws Exception {
        //客户端需要一个事件循环组
        EventLoopGroup group = new NioEventLoopGroup();
        try {
            //创建客户端启动对象
            //注意客户端使用的不是 ServerBootstrap 而是 Bootstrap
            Bootstrap bootstrap = new Bootstrap();
            //设置相关参数
            bootstrap.group(group) //设置线程组
                    .channel(NioSocketChannel.class) // 设置客户端通道的实现类(反射)
                    .handler(new ChannelInitializer<SocketChannel>() {
                        @Override
                        protected void initChannel(SocketChannel ch) throws Exception {
                            ChannelPipeline pipeline = ch.pipeline();
                            //在pipeline中加入 ProtoBufEncoder
                            pipeline.addLast("encoder", new ProtobufEncoder());
                            pipeline.addLast(new NettyClientHandler()); //加入自己的处理器
                        }
                    });
            System.out.println("客户端 ok..");
            //启动客户端去连接服务器端
            //关于 ChannelFuture 要分析,涉及到netty的异步模型
            ChannelFuture channelFuture = bootstrap.connect("127.0.0.1", 6668).sync();
            //给关闭通道进行监听
            channelFuture.channel().closeFuture().sync();
        }finally {
            group.shutdownGracefully();
        }
    }
}
NettyClientHandler
package com.sevattal.netty.codec;
import io.netty.buffer.ByteBuf;
import io.netty.buffer.Unpooled;
import io.netty.channel.ChannelHandlerContext;
import io.netty.channel.ChannelInboundHandlerAdapter;
import io.netty.util.CharsetUtil;
public class NettyClientHandler extends ChannelInboundHandlerAdapter {
    //当通道就绪就会触发该方法
    @Override
    public void channelActive(ChannelHandlerContext ctx) throws Exception {
        //发生一个Student 对象到服务器
        StudentPOJO.Student student = StudentPOJO.Student.newBuilder().setId(4).setName("智多星 吴用").build();
        //Teacher , Member ,Message
        ctx.writeAndFlush(student);
    }
    //当通道有读取事件时,会触发
    @Override
    public void channelRead(ChannelHandlerContext ctx, Object msg) throws Exception {
        ByteBuf buf = (ByteBuf) msg;
        System.out.println("服务器回复的消息:" + buf.toString(CharsetUtil.UTF_8));
        System.out.println("服务器的地址: "+ ctx.channel().remoteAddress());
    }
    @Override
    public void exceptionCaught(ChannelHandlerContext ctx, Throwable cause) throws Exception {
        cause.printStackTrace();
        ctx.close();
    }
}
Protobuf 快速入门实例 2
1.编写程序,使用 Protobuf 完成如下功能
2.客户端可以随机发送 StudentPoJo / WorkerPoJo 对象到服务器(通过 Protobuf 编码)
3.服务端能接收 StudentPoJo / WorkerPoJo 对象(需要判断是哪种类型),并显示信息(通过 Protobuf 解码)
proto
syntax = "proto3";
option optimize_for = SPEED; // 加快解析
option java_package="com.sevattal.netty.codec2";   //指定生成到哪个包下
option java_outer_classname="MyDataInfo"; // 外部类名, 文件名
/*
1.protobuf 可以使用message 管理其他的message。最终决定使用哪一个message作为传输对象
2.假设你某个项目需要传输20个对象,你不可能新建20个proto文件吧。此时你就可以
在一个文件里定义20个message,最后再用一个总的message(比方说这里的MyMessage)
来决定在实际传输时真正需要传输哪一个对象
3.因为你实际传输的时候大部分情况传输的都是一个对象,所以下面用oneof进行了限制
4.是否可以传多个对象呢?我个人认为是可以的,比如可以通过map(目前我也不太了解proto的语法)
 */
message MyMessage {
    //定义一个枚举类型,DataType如果是0则表示一个Student对象实例,DataType这个名称自定义
    enum DataType {
        StudentType = 0; //在proto3 要求enum的编号从0开始
        WorkerType = 1;
    }
    //用data_type 来标识传的是哪一个枚举类型,这里才真正开始定义MyMessage的数据类型
    DataType data_type = 1;  //所有后面的数字都只是编号而已
    /*
    1.oneof关键字 表示每次枚举类型进行传输时,限制最多只能传输一个对象。
    dataBody名称也是自定义的
    2.为什么这里的序号是2呢?因为上面DataType data_type = 1  占了第一个序号了
    3.MyMessage里真正出现的类型只有两个
      ①DataType类型
      ②Student类型或者Worker类型(这两个在真正传输的时候只会有一个出现)
    */
    oneof dataBody {
        Student student = 2;  //注意这后面的数字也都只是编号而已
        Worker worker = 3;
    }
}
message Student {
    int32 id = 1;//Student类的属性
    string name = 2; //
}
message Worker {
    string name=1;
    int32 age=2;
}
NettyServer
package com.sevattal.netty.codec2;
import com.sevattal.netty.codec.StudentPOJO;
import io.netty.bootstrap.ServerBootstrap;
import io.netty.channel.*;
import io.netty.channel.nio.NioEventLoopGroup;
import io.netty.channel.socket.SocketChannel;
import io.netty.channel.socket.nio.NioServerSocketChannel;
import io.netty.handler.codec.protobuf.ProtobufDecoder;
public class NettyServer {
    public static void main(String[] args) throws Exception {
        EventLoopGroup bossGroup = new NioEventLoopGroup(1);
        EventLoopGroup workerGroup = new NioEventLoopGroup(); //8
        try {
            //创建服务器端的启动对象,配置参数
            ServerBootstrap bootstrap = new ServerBootstrap();
            //使用链式编程来进行设置
            bootstrap.group(bossGroup, workerGroup) //设置两个线程组
                    .channel(NioServerSocketChannel.class) //使用NioSocketChannel 作为服务器的通道实现
                    .option(ChannelOption.SO_BACKLOG, 128) // 设置线程队列得到连接个数
                    .childOption(ChannelOption.SO_KEEPALIVE, true) //设置保持活动连接状态
					// .handler(null) // 该 handler对应 bossGroup , childHandler 对应 workerGroup
                    .childHandler(new ChannelInitializer<SocketChannel>() {//创建一个通道初始化对象(匿名对象)
                        //给pipeline 设置处理器
                        @Override
                        protected void initChannel(SocketChannel ch) throws Exception {
                            ChannelPipeline pipeline = ch.pipeline();
                            //在pipeline加入ProtoBufDecoder
                            //指定对哪种对象进行解码
                            pipeline.addLast("decoder", new ProtobufDecoder(MyDataInfo.MyMessage.getDefaultInstance()));
                            pipeline.addLast(new NettyServerHandler());
                        }
                    }); // 给我们的workerGroup 的 EventLoop 对应的管道设置处理器
            System.out.println(".....服务器 is ready...");
            //绑定一个端口并且同步, 生成了一个 ChannelFuture 对象
            //启动服务器(并绑定端口)
            ChannelFuture cf = bootstrap.bind(6668).sync();
            //给cf 注册监听器,监控我们关心的事件
            cf.addListener(new ChannelFutureListener() {
                @Override
                public void operationComplete(ChannelFuture future) throws Exception {
                    if (cf.isSuccess()) {
                        System.out.println("监听端口 6668 成功");
                    } else {
                        System.out.println("监听端口 6668 失败");
                    }
                }
            });
            //对关闭通道进行监听
            cf.channel().closeFuture().sync();
        }finally {
            bossGroup.shutdownGracefully();
            workerGroup.shutdownGracefully();
        }
    }
}
NettyServerHandler
package com.sevattal.netty.codec2;
import com.sevattal.netty.codec.StudentPOJO;
import io.netty.buffer.Unpooled;
import io.netty.channel.ChannelHandlerContext;
import io.netty.channel.SimpleChannelInboundHandler;
import io.netty.util.CharsetUtil;
//public class NettyServerHandler extends ChannelInboundHandlerAdapter {
public class NettyServerHandler extends SimpleChannelInboundHandler<MyDataInfo.MyMessage> {
    //读取数据实际(这里我们可以读取客户端发送的消息)
    /*
    1. ChannelHandlerContext ctx:上下文对象, 含有 管道pipeline , 通道channel, 地址
    2. Object msg: 就是客户端发送的数据 默认Object
     */
    @Override
    public void channelRead0(ChannelHandlerContext ctx, MyDataInfo.MyMessage msg) throws Exception {
        //根据dataType 来显示不同的信息
        MyDataInfo.MyMessage.DataType dataType = msg.getDataType();
        if(dataType == MyDataInfo.MyMessage.DataType.StudentType) {
            MyDataInfo.Student student = msg.getStudent();
            System.out.println("学生id=" + student.getId() + " 学生名字=" + student.getName());
        } else if(dataType == MyDataInfo.MyMessage.DataType.WorkerType) {
            MyDataInfo.Worker worker = msg.getWorker();
            System.out.println("工人的名字=" + worker.getName() + " 年龄=" + worker.getAge());
        } else {
            System.out.println("传输的类型不正确");
        }
    }
    //数据读取完毕
    @Override
    public void channelReadComplete(ChannelHandlerContext ctx) throws Exception {
        //writeAndFlush 是 write + flush
        //将数据写入到缓存,并刷新
        //一般讲,我们对这个发送的数据进行编码
        ctx.writeAndFlush(Unpooled.copiedBuffer("hello, 客户端~(>^ω^<)喵1", CharsetUtil.UTF_8));
    }
    //处理异常, 一般是需要关闭通道
    @Override
    public void exceptionCaught(ChannelHandlerContext ctx, Throwable cause) throws Exception {
        ctx.close();
    }
}
NettyClient
package com.sevattal.netty.codec2;
import io.netty.bootstrap.Bootstrap;
import io.netty.channel.ChannelFuture;
import io.netty.channel.ChannelInitializer;
import io.netty.channel.ChannelPipeline;
import io.netty.channel.EventLoopGroup;
import io.netty.channel.nio.NioEventLoopGroup;
import io.netty.channel.socket.SocketChannel;
import io.netty.channel.socket.nio.NioSocketChannel;
import io.netty.handler.codec.protobuf.ProtobufEncoder;
public class NettyClient {
    public static void main(String[] args) throws Exception {
        //客户端需要一个事件循环组
        EventLoopGroup group = new NioEventLoopGroup();
        try {
            //创建客户端启动对象
            //注意客户端使用的不是 ServerBootstrap 而是 Bootstrap
            Bootstrap bootstrap = new Bootstrap();
            //设置相关参数
            bootstrap.group(group) //设置线程组
                    .channel(NioSocketChannel.class) // 设置客户端通道的实现类(反射)
                    .handler(new ChannelInitializer<SocketChannel>() {
                        @Override
                        protected void initChannel(SocketChannel ch) throws Exception {
                            ChannelPipeline pipeline = ch.pipeline();
                            //在pipeline中加入 ProtoBufEncoder
                            pipeline.addLast("encoder", new ProtobufEncoder());
                            pipeline.addLast(new NettyClientHandler()); //加入自己的处理器
                        }
                    });
            System.out.println("客户端 ok..");
            //启动客户端去连接服务器端
            //关于 ChannelFuture 要分析,涉及到netty的异步模型
            ChannelFuture channelFuture = bootstrap.connect("127.0.0.1", 6668).sync();
            //给关闭通道进行监听
            channelFuture.channel().closeFuture().sync();
        }finally {
            group.shutdownGracefully();
        }
    }
}
NettyClientHandler
package com.sevattal.netty.codec2;
import com.sevattal.netty.codec.StudentPOJO;
import io.netty.buffer.ByteBuf;
import io.netty.channel.ChannelHandlerContext;
import io.netty.channel.ChannelInboundHandlerAdapter;
import io.netty.util.CharsetUtil;
import java.util.Random;
public class NettyClientHandler extends ChannelInboundHandlerAdapter {
    //当通道就绪就会触发该方法
    @Override
    public void channelActive(ChannelHandlerContext ctx) throws Exception {
        //随机的发送Student 或者 Workder 对象
        int random = new Random().nextInt(3);
        MyDataInfo.MyMessage myMessage = null;
        if(0 == random) { //发送Student 对象
            myMessage = MyDataInfo.MyMessage.newBuilder().setDataType(MyDataInfo.MyMessage.DataType.StudentType).setStudent(MyDataInfo.Student.newBuilder().setId(5).setName("玉麒麟 卢俊义").build()).build();
        } else { // 发送一个Worker 对象
            myMessage = MyDataInfo.MyMessage.newBuilder().setDataType(MyDataInfo.MyMessage.DataType.WorkerType).setWorker(MyDataInfo.Worker.newBuilder().setAge(20).setName("老李").build()).build();
        }
        ctx.writeAndFlush(myMessage);
    }
    //当通道有读取事件时,会触发
    @Override
    public void channelRead(ChannelHandlerContext ctx, Object msg) throws Exception {
        ByteBuf buf = (ByteBuf) msg;
        System.out.println("服务器回复的消息:" + buf.toString(CharsetUtil.UTF_8));
        System.out.println("服务器的地址: "+ ctx.channel().remoteAddress());
    }
    @Override
    public void exceptionCaught(ChannelHandlerContext ctx, Throwable cause) throws Exception {
        cause.printStackTrace();
        ctx.close();
    }
}
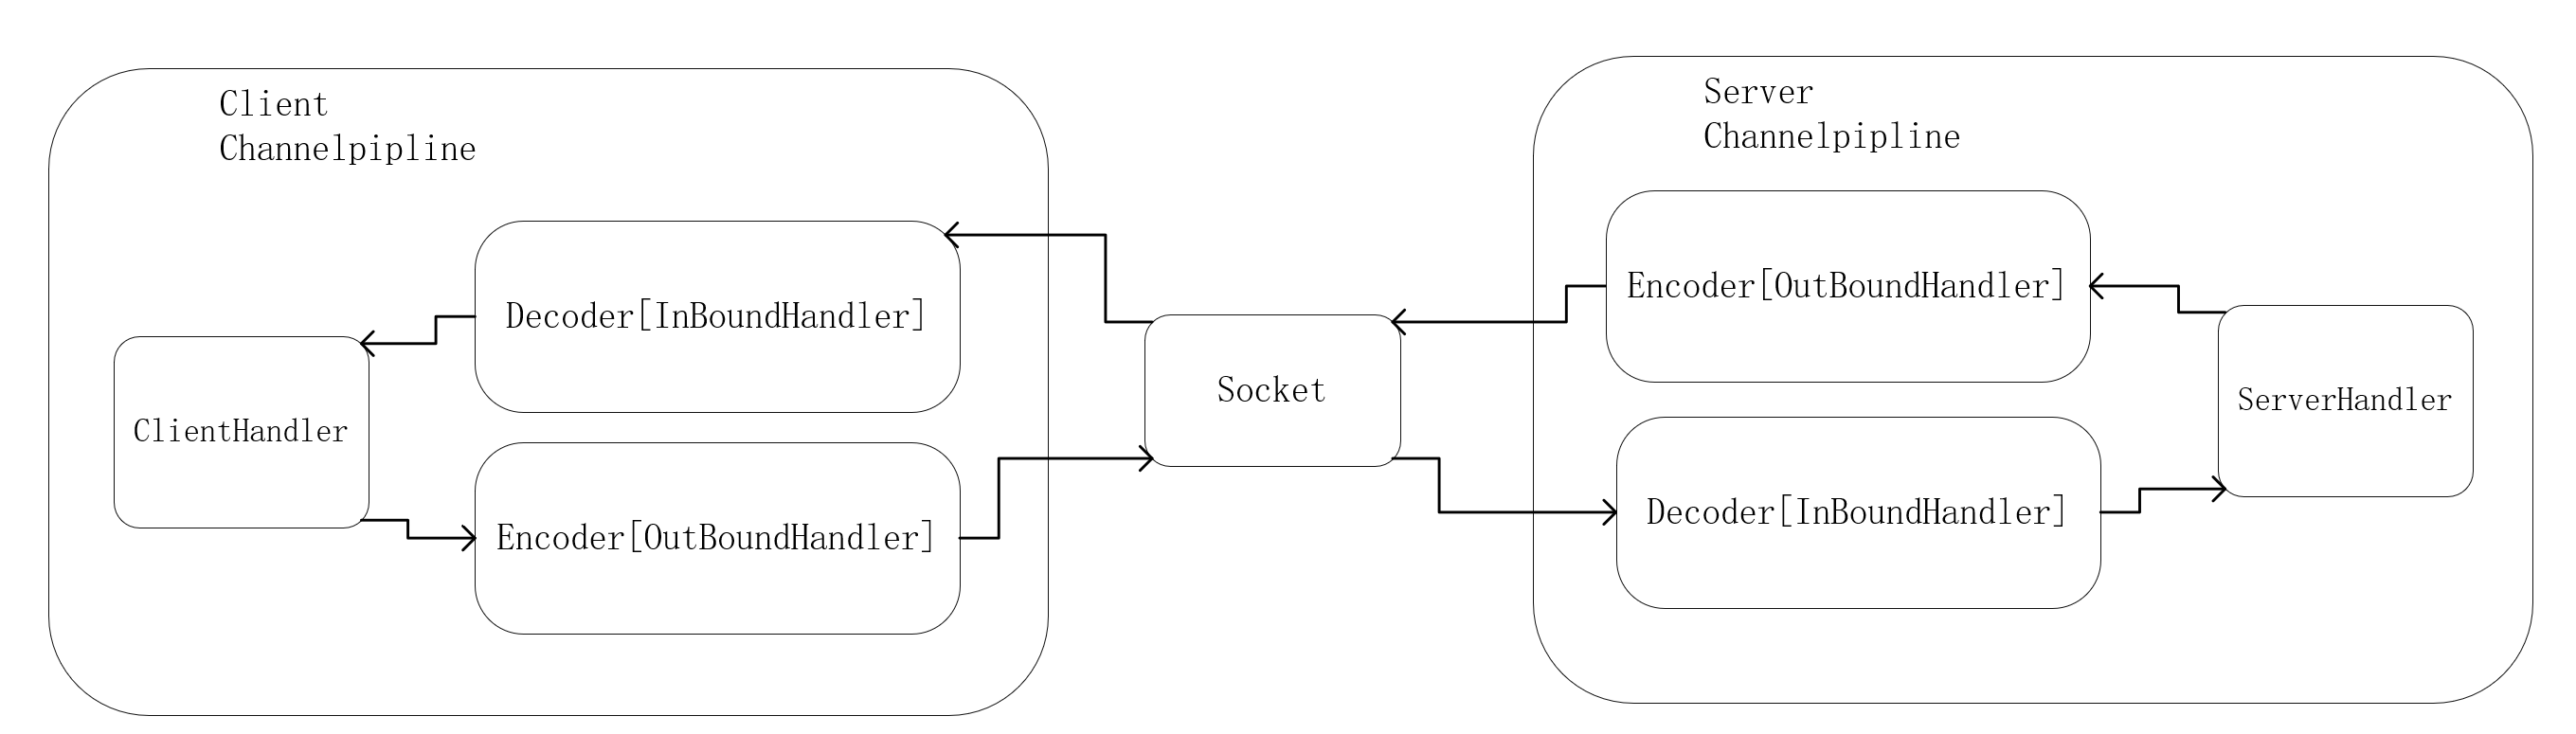
Netty 编解码器和 Handler 调用机制
基本说明
1.Netty 的组件设计:Netty 的主要组件有 Channel、EventLoop、ChannelFuture、ChannelHandler、ChannelPipe 等
2.ChannelHandler 充当了处理入站和出站数据的应用程序逻辑的容器。例如,实现 ChannelInboundHandler 接口(或 ChannelInboundHandlerAdapter),你就可以接收入站事件和数据,这些数据会被业务逻辑处理。当要给客户端发送响应时,也可以从 ChannelInboundHandler 冲刷数据。业务逻辑通常写在一个或者多个 ChannelInboundHandler 中。ChannelOutboundHandler 原理一样,只不过它是用来处理出站数据的
3.ChannelPipeline 提供了 ChannelHandler 链的容器。以客户端应用程序为例,如果事件的运动方向是从客户端到服务端的,那么我们称这些事件为出站的,即客户端发送给服务端的数据会通过 pipeline 中的一系列 ChannelOutboundHandler,并被这些 Handler 处理,反之则称为入站的
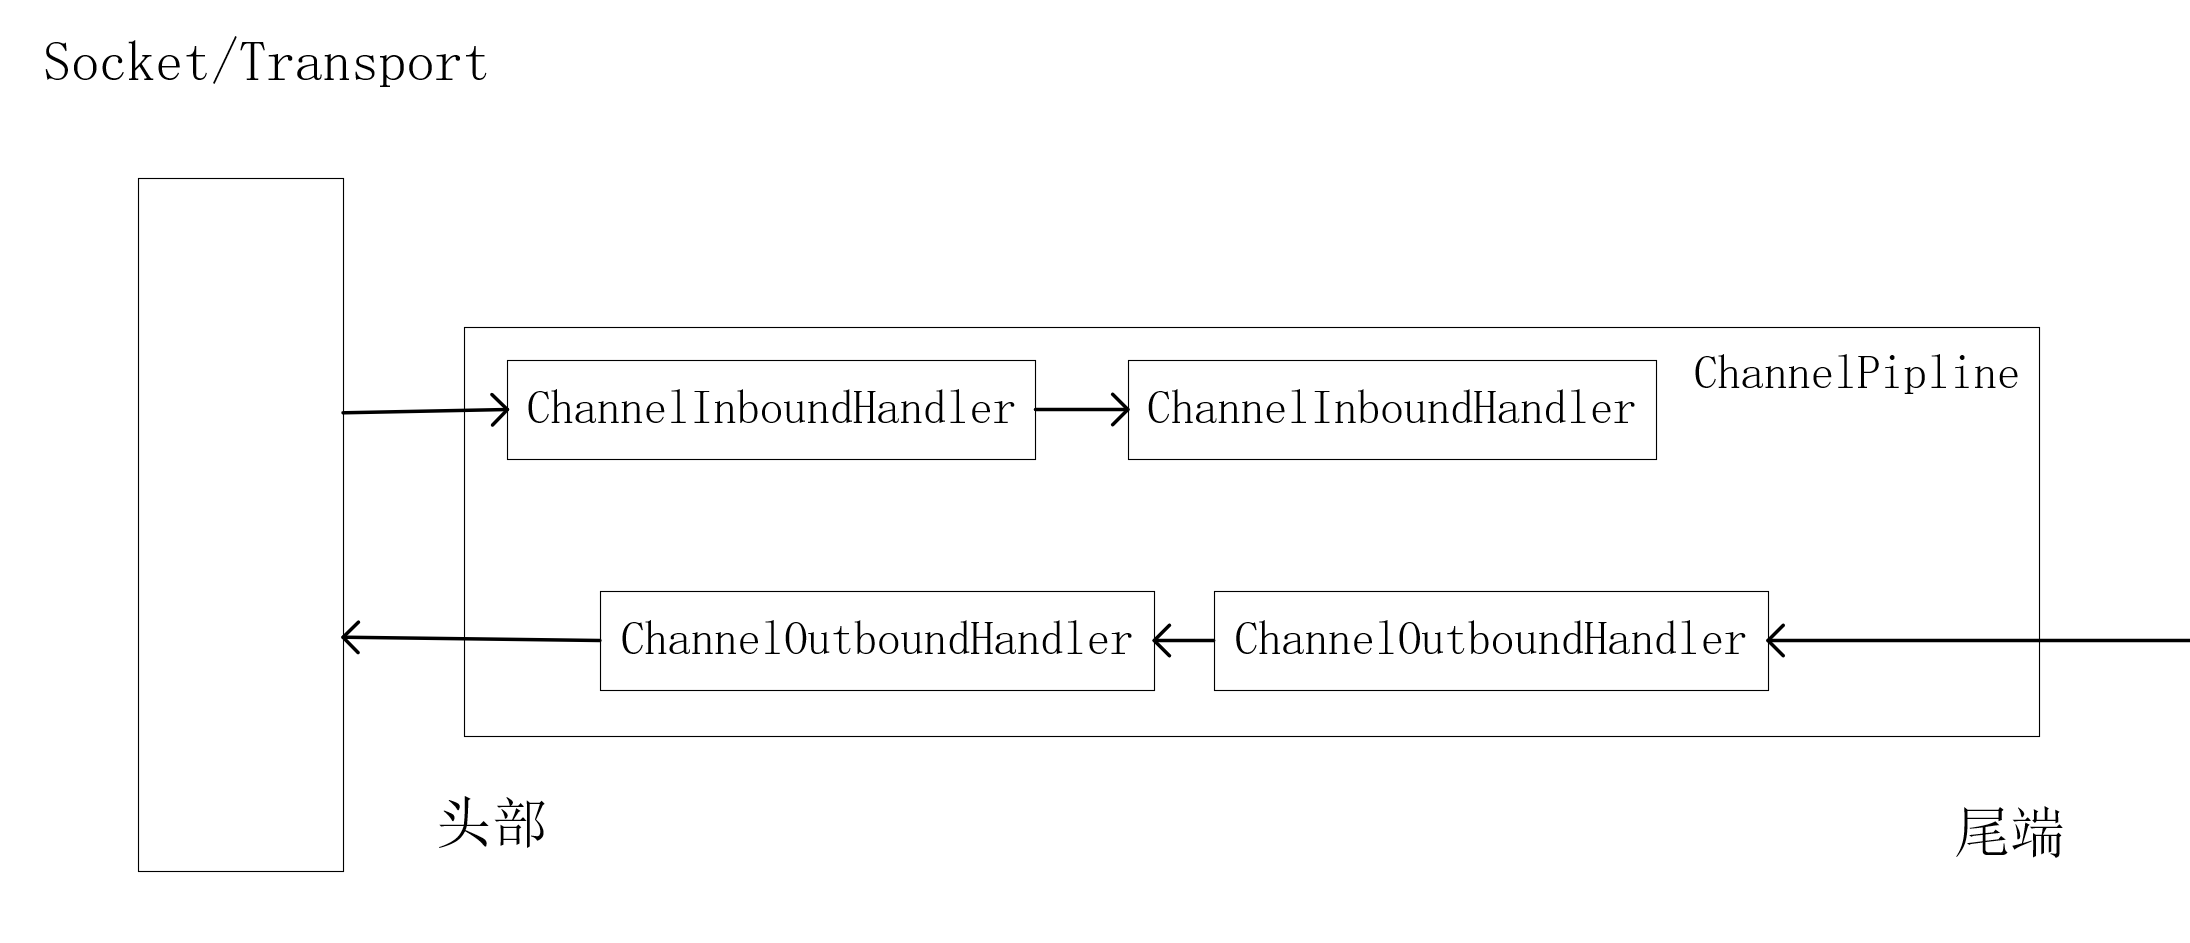
出站,入站如果搞不清楚,看下面的Netty的handler链的调用机制,通过一个例子和图讲清楚
编码解码器
1.当 Netty 发送或者接受一个消息的时候,就将会发生一次数据转换。入站消息会被解码:从字节转换为另一种格式(比如 java 对象);如果是出站消息,它会被编码成字节。
2.Netty 提供一系列实用的编解码器,他们都实现了 ChannelInboundHadnler 或者 ChannelOutboundHandler 接口。在这些类中,channelRead 方法已经被重写了。以入站为例,对于每个从入站 Channel 读取的消息,这个方法会被调用。随后,它将调用由解码器所提供的 decode() 方法进行解码,并将已经解码的字节转发给 ChannelPipeline 中的下一个 ChannelInboundHandler。
解码器 - ByteToMessageDecoder
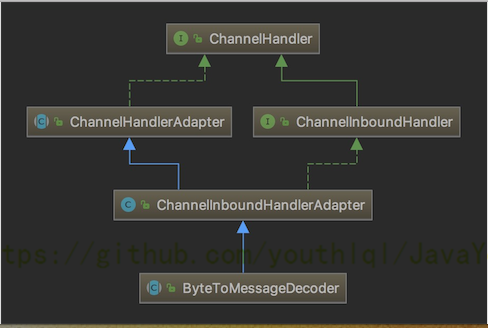
1.关系继承图
2.由于不可能知道远程节点是否会一次性发送一个完整的信息,tcp 有可能出现粘包拆包的问题,这个类会对入站数据进行缓冲,直到它准备好被处理.【后面有说TCP的粘包和拆包问题】
3.一个关于 ByteToMessageDecoder 实例分析
public class ToIntegerDecoder extends ByteToMessageDecoder {
	@Override
	protected void decode(ChannelHandlerContext ctx, ByteBuf in, List<Object> out) throws Exception {
		if (in,readableBytes() >= 4) {
			out.add(in.readInt());
		}
	}
}
说明:
1. 这个例子,每次入站从ByteBuf中读取4字节,将其解码为一个int,然后将它添加到下一个List中。当没有更多元素可以被添加到该List中时,它的内容会被送给下一个ChannelInboundHandler。int在被添加到List中时,会被自动装箱为Integer。在调用readInt()方法前必须验证所输入的ByteBuf是否具有足够的数据
2.decode执行分析图
Netty的handler链的调用机制
实例要求:
1.使用自定义的编码器和解码器来说明 Netty 的 handler 调用机制
客户端发送 long -> 服务器
服务端发送 long -> 客户端
读者可以看下这个图,带着这个图去看下面的例子。
MyServer
package com.sevattal.netty.inboundhandlerandoutboundhandler;
import io.netty.bootstrap.ServerBootstrap;
import io.netty.channel.ChannelFuture;
import io.netty.channel.EventLoopGroup;
import io.netty.channel.nio.NioEventLoopGroup;
import io.netty.channel.socket.nio.NioServerSocketChannel;
public class MyServer {
    public static void main(String[] args) throws Exception{
        EventLoopGroup bossGroup = new NioEventLoopGroup(1);
        EventLoopGroup workerGroup = new NioEventLoopGroup();
        try {
            ServerBootstrap serverBootstrap = new ServerBootstrap();
            serverBootstrap.group(bossGroup,workerGroup).channel(NioServerSocketChannel.class).childHandler(new MyServerInitializer()); //自定义一个初始化类
            ChannelFuture channelFuture = serverBootstrap.bind(7000).sync();
            channelFuture.channel().closeFuture().sync();
        }finally {
            bossGroup.shutdownGracefully();
            workerGroup.shutdownGracefully();
        }
    }
}
MyServerInitializer
package com.sevattal.netty.inboundhandlerandoutboundhandler;
import io.netty.channel.ChannelInitializer;
import io.netty.channel.ChannelPipeline;
import io.netty.channel.socket.SocketChannel;
public class MyServerInitializer extends ChannelInitializer<SocketChannel> {
@Override
protected void initChannel(SocketChannel ch) throws Exception {
ChannelPipeline pipeline = ch.pipeline();//一会下断点
//入站的handler进行解码 MyByteToLongDecoder
pipeline.addLast(new MyByteToLongDecoder());
//出站的handler进行编码
pipeline.addLast(new MyLongToByteEncoder());
//自定义的handler 处理业务逻辑
pipeline.addLast(new MyServerHandler());
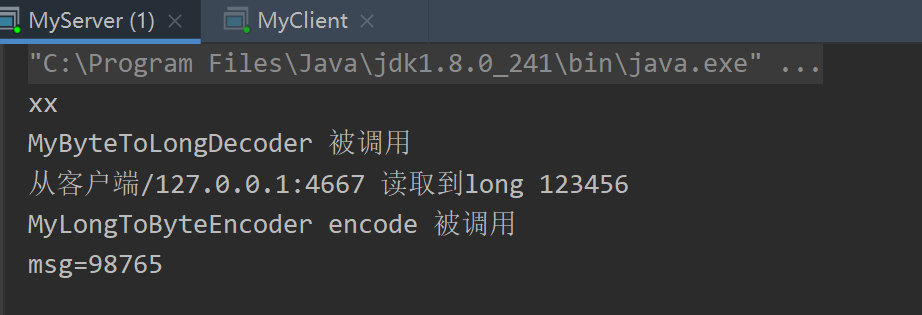
System.out.println("xx");
}
}
MyServerHandler
package com.sevattal.netty.inboundhandlerandoutboundhandler;
import io.netty.channel.ChannelHandlerContext;
import io.netty.channel.SimpleChannelInboundHandler;
public class MyServerHandler extends SimpleChannelInboundHandler<Long> {
    @Override
    protected void channelRead0(ChannelHandlerContext ctx, Long msg) throws Exception {
        System.out.println("从客户端" + ctx.channel().remoteAddress() + " 读取到long " + msg);
        //给客户端发送一个long
        ctx.writeAndFlush(98765L);
    }
    @Override
    public void exceptionCaught(ChannelHandlerContext ctx, Throwable cause) throws Exception {
        cause.printStackTrace();
        ctx.close();
    }
}
MyClient
package com.sevattal.netty.inboundhandlerandoutboundhandler;
import io.netty.bootstrap.Bootstrap;
import io.netty.channel.ChannelFuture;
import io.netty.channel.EventLoopGroup;
import io.netty.channel.nio.NioEventLoopGroup;
import io.netty.channel.socket.nio.NioSocketChannel;
public class MyClient {
    public static void main(String[] args)  throws  Exception{
        EventLoopGroup group = new NioEventLoopGroup();
        try {
            Bootstrap bootstrap = new Bootstrap();
            bootstrap.group(group).channel(NioSocketChannel.class)
                    .handler(new MyClientInitializer()); //自定义一个初始化类
            ChannelFuture channelFuture = bootstrap.connect("localhost", 7000).sync();
            channelFuture.channel().closeFuture().sync();
        }finally {
            group.shutdownGracefully();
        }
    }
}
MyClientInitializer
package com.sevattal.netty.inboundhandlerandoutboundhandler;
import io.netty.channel.ChannelInitializer;
import io.netty.channel.ChannelPipeline;
import io.netty.channel.socket.SocketChannel;
public class MyClientInitializer extends ChannelInitializer<SocketChannel> {
    @Override
    protected void initChannel(SocketChannel ch) throws Exception {
        ChannelPipeline pipeline = ch.pipeline();
        //加入一个出站的handler 对数据进行一个编码
        pipeline.addLast(new MyLongToByteEncoder());
        //这时一个入站的解码器(入站handler )
        pipeline.addLast(new MyByteToLongDecoder());
        //加入一个自定义的handler , 处理业务
        pipeline.addLast(new MyClientHandler());
    }
}
MyClientHandler
package com.sevattal.netty.inboundhandlerandoutboundhandler;
import io.netty.buffer.Unpooled;
import io.netty.channel.ChannelHandlerContext;
import io.netty.channel.SimpleChannelInboundHandler;
import io.netty.util.CharsetUtil;
import java.nio.charset.Charset;
public class MyClientHandler extends SimpleChannelInboundHandler<Long> {
@Override
protected void channelRead0(ChannelHandlerContext ctx, Long msg) throws Exception {
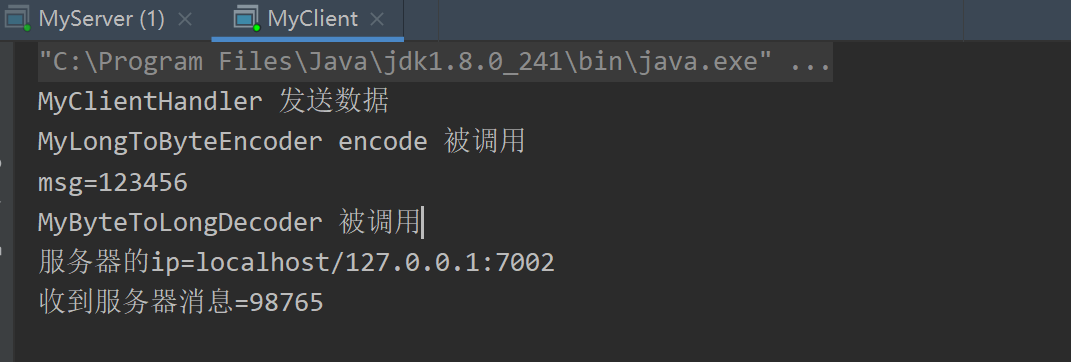
System.out.println("服务器的ip=" + ctx.channel().remoteAddress());
System.out.println("收到服务器消息=" + msg);
}
//重写channelActive 发送数据
@Override
public void channelActive(ChannelHandlerContext ctx) throws Exception {
System.out.println("MyClientHandler 发送数据");
//ctx.writeAndFlush(Unpooled.copiedBuffer(""))
ctx.writeAndFlush(123456L); //发送的是一个long
}
}
MyByteToLongDecoder
package com.sevattal.netty.inboundhandlerandoutboundhandler;
import io.netty.buffer.ByteBuf;
import io.netty.channel.ChannelHandlerContext;
import io.netty.handler.codec.ByteToMessageDecoder;
import java.util.List;
public class MyByteToLongDecoder extends ByteToMessageDecoder {
    /**
     *
     * decode 会根据接收的数据,被调用多次, 直到确定没有新的元素被添加到list
     * , 或者是ByteBuf 没有更多的可读字节为止
     * 如果list out 不为空,就会将list的内容传递给下一个 channelinboundhandler处理,
     * 该处理器的方法也会被调用多次
     *
     * @param ctx 上下文对象
     * @param in 入站的 ByteBuf
     * @param out List 集合,将解码后的数据传给下一个handler
     * @throws Exception
     */
    @Override
    protected void decode(ChannelHandlerContext ctx, ByteBuf in, List<Object> out) throws Exception {
        System.out.println("MyByteToLongDecoder 被调用");
        //因为 long 8个字节, 需要判断有8个字节,才能读取一个long
        if(in.readableBytes() >= 8) {
            out.add(in.readLong());
        }
    }
}
MyLongToByteEncoder
package com.sevattal.netty.inboundhandlerandoutboundhandler;
import io.netty.buffer.ByteBuf;
import io.netty.channel.ChannelHandlerContext;
import io.netty.handler.codec.MessageToByteEncoder;
public class MyLongToByteEncoder extends MessageToByteEncoder<Long> {
    //编码方法
    @Override
    protected void encode(ChannelHandlerContext ctx, Long msg, ByteBuf out) throws Exception {
        System.out.println("MyLongToByteEncoder encode 被调用");
        System.out.println("msg=" + msg);
        out.writeLong(msg);
    }
}
效果
出站入站
关于出站入站,很多人可能有点迷糊
1)客户端有出站入站,服务端也有出站入站
2)以客户端为例,如果有服务端传送的数据到达客户端,那么对于客户端来说就是入站;
如果客户端传送数据到服务端,那么对于客户端来说就是出站;
同理,对于服务端来说,也是一样的,有数据来就是入站,有数据输出就是出站
3)为什么服务端和客户端的Serverhandler都是继承SimpleChannelInboundHandler,而没有ChannelOutboundHandler出站类?
实际上当我们在handler中调用ctx.writeAndFlush()方法后,就会将数据交给ChannelOutboundHandler进行出站处理,只是我们没有去定义出站类而已,若有需求可以自己去实现ChannelOutboundHandler出站类
4)总结就是客户端和服务端都有出站和入站的操作
服务端发数据给客户端:服务端—>出站—>Socket通道—>入站—>客户端
客户端发数据给服务端:客户端—>出站—>Socket通道—>入站—>服务端
下面是Netty官方源码给的图,我个人觉的不是太好理解,上面的图好理解一些
ByteToMessageDecoder的小细节
package com.sevattal.netty.inboundhandlerandoutboundhandler;
import io.netty.buffer.Unpooled;
import io.netty.channel.ChannelHandlerContext;
import io.netty.channel.SimpleChannelInboundHandler;
import io.netty.util.CharsetUtil;
import java.nio.charset.Charset;
public class MyClientHandler  extends SimpleChannelInboundHandler<Long> {
    @Override
    protected void channelRead0(ChannelHandlerContext ctx, Long msg) throws Exception {
        System.out.println("服务器的ip=" + ctx.channel().remoteAddress());
        System.out.println("收到服务器消息=" + msg);
    }
    //重写channelActive 发送数据
    @Override
    public void channelActive(ChannelHandlerContext ctx) throws Exception {
        System.out.println("MyClientHandler 发送数据");
        //分析
        //1. "abcdabcdabcdabcd" 是 16个字节
        ctx.writeAndFlush(Unpooled.copiedBuffer("abcdabcdabcdabcd",CharsetUtil.UTF_8));
    }
}

package com.sevattal.netty.inboundhandlerandoutboundhandler;
import io.netty.buffer.ByteBuf;
import io.netty.channel.ChannelHandlerContext;
import io.netty.handler.codec.ByteToMessageDecoder;
import java.util.List;
public class MyByteToLongDecoder extends ByteToMessageDecoder {
    /**
     *
     * decode 会根据接收的数据,被调用多次, 直到确定没有新的元素被添加到list
     * , 或者是ByteBuf 没有更多的可读字节为止
     * 如果list out 不为空,就会将list的内容传递给下一个 channelinboundhandler处理,
     * 该处理器的方法也会被调用多次
     *
     * @param ctx 上下文对象
     * @param in 入站的 ByteBuf
     * @param out List 集合,将解码后的数据传给下一个handler
     * @throws Exception
     */
    @Override
    protected void decode(ChannelHandlerContext ctx, ByteBuf in, List<Object> out) throws Exception {
        System.out.println("MyByteToLongDecoder 被调用");
        //因为 long 8个字节, 需要判断有8个字节,才能读取一个long
        if(in.readableBytes() >= 8) {
            out.add(in.readLong());
        }
    }
}
1.由于发送的字符串是16字节,根据上面注释说的内容,decode会被调用两次
如下图验证结果:
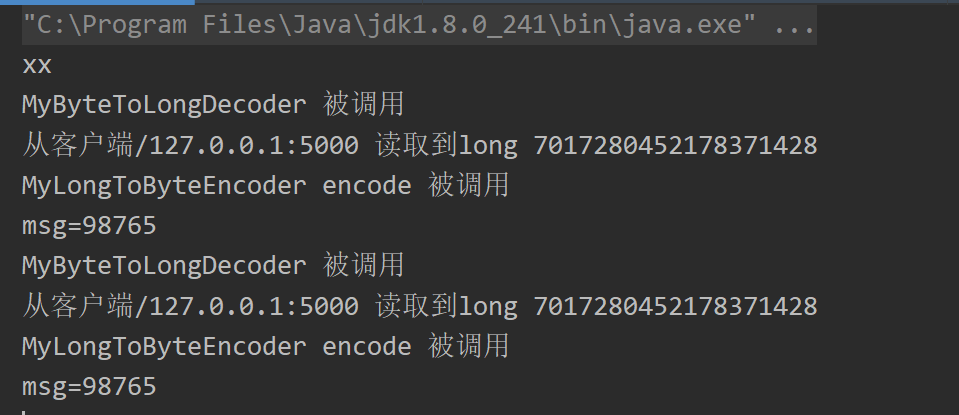
2.同时又引出了一个小问题

当我们MyClientHandler传一个Long时,会调用我们的MyLongToByteEncoder的编码器。那么控制台就会打印这样一句话:MyLongToByteEncoder encode 被调用。但是这里并没有调用编码器,这是为什么呢?
1.MyClientHandler这个处理器的后一个处理器是MyLongToByteEncoder
2.MyLongToByteEncoder的父类是MessageToByteEncoder,在MessageToByteEncoder中有下面的一个方法

@Override
public void write(ChannelHandlerContext ctx, Object msg, ChannelPromise promise) throws Exception {
    ByteBuf buf = null;
    try {
        //这里会判断当前msg 是不是应该处理的类型,如果是就处理,不是就跳过encode
        if (acceptOutboundMessage(msg)) {
            @SuppressWarnings("unchecked")
            I cast = (I) msg;
            buf = allocateBuffer(ctx, cast, preferDirect);
            try {
                encode(ctx, cast, buf);
            } finally {
                ReferenceCountUtil.release(cast);
            }
            if (buf.isReadable()) {
                ctx.write(buf, promise);
            } else {
                buf.release();
                ctx.write(Unpooled.EMPTY_BUFFER, promise);
            }
            buf = null;
        } else {
            ctx.write(msg, promise);
        }
    } catch (EncoderException e) {
        throw e;
    } catch (Throwable e) {
        throw new EncoderException(e);
    } finally {
        if (buf != null) {
            buf.release();
        }
    }
}
3.当我们以这样的形式发送数据
ctx.writeAndFlush(Unpooled.copiedBuffer("abcdabcdabcdabcd",CharsetUtil.UTF_8));
这两个类型并不匹配,也就不会走编码器。因此我们编写 Encoder 是要注意传入的数据类型和处理的数据类型一致
结论:
不论解码器 handler 还是编码器 handler 即接收的消息类型必须与待处理的消息类型一致,否则该 handler 不会被执行
在解码器进行数据解码时,需要判断缓存区(ByteBuf)的数据是否足够,否则接收到的结果会期望结果可能不一致。
解码器 - ReplayingDecoder
1.public abstract class ReplayingDecoder extends ByteToMessageDecoder
2.ReplayingDecoder 扩展了 ByteToMessageDecoder 类,使用这个类,我们不必调用 readableBytes() 方法,也就不用判断还有没有足够的数据来读取。参数 S 指定了用户状态管理的类型,其中 Void 代表不需要状态管理
3.应用实例:使用 ReplayingDecoder 编写解码器,对前面的案例进行简化[案例演示]
package com.sevattal.netty.inboundhandlerandoutboundhandler;
import io.netty.buffer.ByteBuf;
import io.netty.channel.ChannelHandlerContext;
import io.netty.handler.codec.ReplayingDecoder;
import java.util.List;
public class MyByteToLongDecoder2 extends ReplayingDecoder<Void> {
    @Override
    protected void decode(ChannelHandlerContext ctx, ByteBuf in, List<Object> out) throws Exception {
        System.out.println("MyByteToLongDecoder2 被调用");
        //在 ReplayingDecoder 不需要判断数据是否足够读取,内部会进行处理判断
        out.add(in.readLong());
    }
}
4.ReplayingDecoder 使用方便,但它也有一些局限性:
1.并不是所有的 ByteBuf 操作都被支持,如果调用了一个不被支持的方法,将会抛出一个 UnsupportedOperationException。
2.ReplayingDecoder 在某些情况下可能稍慢于 ByteToMessageDecoder,例如网络缓慢并且消息格式复杂时,消息会被拆成了多个碎片,速度变慢
其它编解码器
1.LineBasedFrameDecoder:这个类在 Netty 内部也有使用,它使用行尾控制字符(\n或者\r\n)作为分隔符来解析数据。
2.DelimiterBasedFrameDecoder:使用自定义的特殊字符作为消息的分隔符。
3.HttpObjectDecoder:一个 HTTP 数据的解码器
4.LengthFieldBasedFrameDecoder:通过指定长度来标识整包消息,这样就可以自动的处理黏包和半包消息。
Log4j 整合到 Netty
1.在 Maven 中添加对 Log4j 的依赖在 pom.xml
<dependency>
    <groupId>log4j</groupId>
    <artifactId>log4j</artifactId>
    <version>1.2.17</version>
</dependency>
<dependency>
    <groupId>org.slf4j</groupId>
    <artifactId>slf4j-api</artifactId>
    <version>1.7.25</version>
</dependency>
<dependency>
    <groupId>org.slf4j</groupId>
    <artifactId>slf4j-log4j12</artifactId>
    <version>1.7.25</version>
    <scope>test</scope>
</dependency>
<dependency>
    <groupId>org.slf4j</groupId>
    <artifactId>slf4j-simple</artifactId>
    <version>1.7.25</version>
    <scope>test</scope>
</dependency>
2.配置 Log4j,在 resources/log4j.properties
log4j.rootLogger=DEBUG,stdout
log4j.appender.stdout=org.apache.log4j.ConsoleAppender
log4j.appender.stdout.layout=org.apache.log4j.PatternLayout
log4j.appender.stdout.layout.ConversionPattern=[%p]%C{1}-%m%n
3.演示整合
TCP 粘包和拆包及解决方案
TCP 粘包和拆包基本介绍
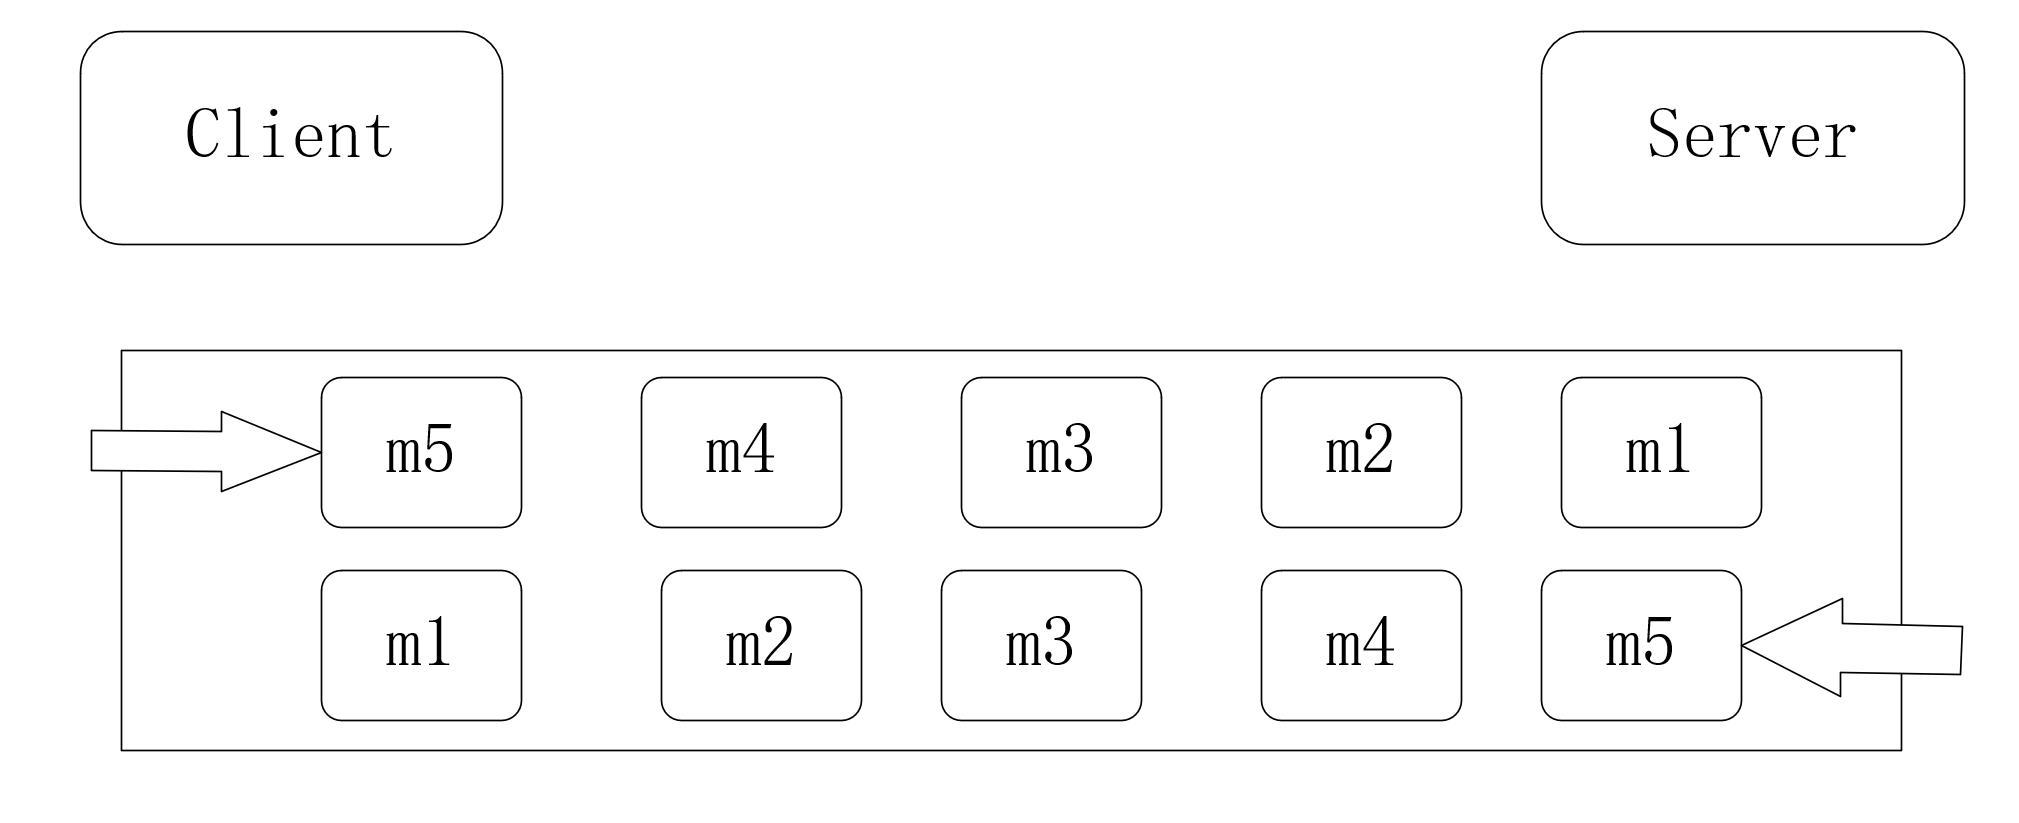
1.TCP 是面向连接的,面向流的,提供高可靠性服务。收发两端(客户端和服务器端)都要有一一成对的 socket,因此,发送端为了将多个发给接收端的包,更有效的发给对方,使用了优化方法(Nagle 算法),将多次间隔较小且数据量小的数据,合并成一个大的数据块,然后进行封包。这样做虽然提高了效率,但是接收端就难于分辨出完整的数据包了,因为面向流的通信是无消息保护边界的
2.由于 TCP 无消息保护边界,需要在接收端处理消息边界问题,也就是我们所说的粘包、拆包问题,看一张图
3.TCP 粘包、拆包图解
假设客户端分别发送了两个数据包 D1 和 D2 给服务端,由于服务端一次读取到字节数是不确定的,故可能存在以下四种情况:
1.服务端分两次读取到了两个独立的数据包,分别是 D1 和 D2,没有粘包和拆包
2.服务端一次接受到了两个数据包,D1 和 D2 粘合在一起,称之为 TCP 粘包
3.服务端分两次读取到了数据包,第一次读取到了完整的 D1 包和 D2 包的部分内容,第二次读取到了 D2 包的剩余内容,这称之为 TCP 拆包
4.服务端分两次读取到了数据包,第一次读取到了 D1 包的部分内容 D1_1,第二次读取到了 D1 包的剩余部分内容 D1_2 和完整的 D2 包。
TCP 粘包和拆包现象实例
在编写 Netty 程序时,如果没有做处理,就会发生粘包和拆包的问题
看一个具体的实例:
MyServer
package com.sevattal.netty.tcp;
import io.netty.bootstrap.ServerBootstrap;
import io.netty.channel.ChannelFuture;
import io.netty.channel.EventLoopGroup;
import io.netty.channel.nio.NioEventLoopGroup;
import io.netty.channel.socket.nio.NioServerSocketChannel;
public class MyServer {
    public static void main(String[] args) throws Exception{
        EventLoopGroup bossGroup = new NioEventLoopGroup(1);
        EventLoopGroup workerGroup = new NioEventLoopGroup();
        try {
            ServerBootstrap serverBootstrap = new ServerBootstrap();
            serverBootstrap.group(bossGroup,workerGroup).channel(NioServerSocketChannel.class).childHandler(new MyServerInitializer()); //自定义一个初始化类
            ChannelFuture channelFuture = serverBootstrap.bind(7000).sync();
            channelFuture.channel().closeFuture().sync();
        }finally {
            bossGroup.shutdownGracefully();
            workerGroup.shutdownGracefully();
        }
    }
}
MyServerInitializer
package com.sevattal.netty.tcp;
import io.netty.channel.ChannelInitializer;
import io.netty.channel.ChannelPipeline;
import io.netty.channel.socket.SocketChannel;
public class MyServerInitializer extends ChannelInitializer<SocketChannel> {
    @Override
    protected void initChannel(SocketChannel ch) throws Exception {
        ChannelPipeline pipeline = ch.pipeline();
        pipeline.addLast(new MyServerHandler());
    }
}
MyServerHandler
package com.sevatta.netty.tcp;
import io.netty.buffer.ByteBuf;
import io.netty.buffer.Unpooled;
import io.netty.channel.ChannelHandlerContext;
import io.netty.channel.SimpleChannelInboundHandler;
import java.nio.charset.Charset;
import java.util.UUID;
public class MyServerHandler extends SimpleChannelInboundHandler<ByteBuf>{
    private int count;
    @Override
    public void exceptionCaught(ChannelHandlerContext ctx, Throwable cause) throws Exception {
        //cause.printStackTrace();
        ctx.close();
    }
    @Override
    protected void channelRead0(ChannelHandlerContext ctx, ByteBuf msg) throws Exception {
        byte[] buffer = new byte[msg.readableBytes()];
        msg.readBytes(buffer);
        //将buffer转成字符串
        String message = new String(buffer, Charset.forName("utf-8"));
        System.out.println("服务器接收到数据 " + message);
        System.out.println("服务器接收到消息量=" + (++this.count));
        //服务器回送数据给客户端, 回送一个随机id ,
        ByteBuf responseByteBuf = Unpooled.copiedBuffer(UUID.randomUUID().toString() + " ", Charset.forName("utf-8"));
        ctx.writeAndFlush(responseByteBuf);
    }
}
MyClient
package com.sevattal.netty.tcp;
import io.netty.bootstrap.Bootstrap;
import io.netty.channel.ChannelFuture;
import io.netty.channel.EventLoopGroup;
import io.netty.channel.nio.NioEventLoopGroup;
import io.netty.channel.socket.nio.NioSocketChannel;
public class MyClient {
    public static void main(String[] args)  throws  Exception{
        EventLoopGroup group = new NioEventLoopGroup();
        try {
            Bootstrap bootstrap = new Bootstrap();
            bootstrap.group(group).channel(NioSocketChannel.class)
                    .handler(new MyClientInitializer()); //自定义一个初始化类
            ChannelFuture channelFuture = bootstrap.connect("localhost", 7000).sync();
            channelFuture.channel().closeFuture().sync();
        }finally {
            group.shutdownGracefully();
        }
    }
}
MyClientInitializer
package com.sevattal.netty.tcp;
import io.netty.channel.ChannelInitializer;
import io.netty.channel.ChannelPipeline;
import io.netty.channel.socket.SocketChannel;
public class MyClientInitializer extends ChannelInitializer<SocketChannel> {
    @Override
    protected void initChannel(SocketChannel ch) throws Exception {
        ChannelPipeline pipeline = ch.pipeline();
        pipeline.addLast(new MyClientHandler());
    }
}
MyClientHandler
package com.sevattal.netty.tcp;
import io.netty.buffer.ByteBuf;
import io.netty.buffer.Unpooled;
import io.netty.channel.ChannelHandlerContext;
import io.netty.channel.SimpleChannelInboundHandler;
import java.nio.charset.Charset;
public class MyClientHandler extends SimpleChannelInboundHandler<ByteBuf> {
    private int count;
    @Override
    public void channelActive(ChannelHandlerContext ctx) throws Exception {
        //使用客户端发送10条数据 hello,server 编号
        for(int i= 0; i< 10; ++i) {
            ByteBuf buffer = Unpooled.copiedBuffer("hello,server " + i, Charset.forName("utf-8"));
            ctx.writeAndFlush(buffer);
        }
    }
    @Override
    protected void channelRead0(ChannelHandlerContext ctx, ByteBuf msg) throws Exception {
        byte[] buffer = new byte[msg.readableBytes()];
        msg.readBytes(buffer);
        String message = new String(buffer, Charset.forName("utf-8"));
        System.out.println("客户端接收到消息=" + message);
        System.out.println("客户端接收消息数量=" + (++this.count));
    }
    @Override
    public void exceptionCaught(ChannelHandlerContext ctx, Throwable cause) throws Exception {
        cause.printStackTrace();
        ctx.close();
    }
}
效果
第一次运行:
Client

Server

第二次运行:
Client
Server
可以看到第一次运行时,服务器一次性将10个数据都接收了,第二次运行时分六次接收的,这就很形象的看出了TCP的粘包现象。
TCP 粘包和拆包解决方案
1.常用方案:使用自定义协议+编解码器来解决
2.关键就是要解决服务器端每次读取数据长度的问题,这个问题解决,就不会出现服务器多读或少读数据的问题,从而避免的 TCP 粘包、拆包。
看一个具体的实例
1.要求客户端发送 5 个 Message 对象,客户端每次发送一个 Message 对象
2.服务器端每次接收一个 Message,分 5 次进行解码,每读取到一个 Message,会回复一个 Message 对象给客户端。
MessageProtocol
package com.sevattal.netty.protocoltcp;
//协议包
public class MessageProtocol {
    private int len; //关键
    private byte[] content;
    public int getLen() {
        return len;
    }
    public void setLen(int len) {
        this.len = len;
    }
    public byte[] getContent() {
        return content;
    }
    public void setContent(byte[] content) {
        this.content = content;
    }
}
MyServer
package com.sevattal.netty.protocoltcp;
import io.netty.bootstrap.ServerBootstrap;
import io.netty.channel.ChannelFuture;
import io.netty.channel.EventLoopGroup;
import io.netty.channel.nio.NioEventLoopGroup;
import io.netty.channel.socket.nio.NioServerSocketChannel;
public class MyServer {
    public static void main(String[] args) throws Exception{
        EventLoopGroup bossGroup = new NioEventLoopGroup(1);
        EventLoopGroup workerGroup = new NioEventLoopGroup();
        try {
            ServerBootstrap serverBootstrap = new ServerBootstrap();
            serverBootstrap.group(bossGroup,workerGroup).channel(NioServerSocketChannel.class).childHandler(new MyServerInitializer()); //自定义一个初始化类
            ChannelFuture channelFuture = serverBootstrap.bind(7000).sync();
            channelFuture.channel().closeFuture().sync();
        }finally {
            bossGroup.shutdownGracefully();
            workerGroup.shutdownGracefully();
        }
    }
}
MyServerInitializer
package com.sevattal.netty.protocoltcp;
import io.netty.channel.ChannelInitializer;
import io.netty.channel.ChannelPipeline;
import io.netty.channel.socket.SocketChannel;
public class MyServerInitializer extends ChannelInitializer<SocketChannel> {
    @Override
    protected void initChannel(SocketChannel ch) throws Exception {
        ChannelPipeline pipeline = ch.pipeline();
        pipeline.addLast(new MyMessageDecoder());//解码器
        pipeline.addLast(new MyMessageEncoder());//编码器
        pipeline.addLast(new MyServerHandler());
    }
}
MyServerHandler
package com.sevattal.netty.protocoltcp;
import io.netty.buffer.ByteBuf;
import io.netty.buffer.Unpooled;
import io.netty.channel.ChannelHandlerContext;
import io.netty.channel.SimpleChannelInboundHandler;
import java.nio.charset.Charset;
import java.util.UUID;
//处理业务的handler
public class MyServerHandler extends SimpleChannelInboundHandler<MessageProtocol>{
    private int count;
    @Override
    public void exceptionCaught(ChannelHandlerContext ctx, Throwable cause) throws Exception {
        //cause.printStackTrace();
        ctx.close();
    }
    @Override
    protected void channelRead0(ChannelHandlerContext ctx, MessageProtocol msg) throws Exception {
        //接收到数据,并处理
        int len = msg.getLen();
        byte[] content = msg.getContent();
        System.out.println("服务器接收到信息如下");
        System.out.println("长度=" + len);
        System.out.println("内容=" + new String(content, Charset.forName("utf-8")));
        System.out.println("服务器接收到消息包数量=" + (++this.count));
        //回复消息
        System.out.println("服务端开始回复消息------");
        String responseContent = UUID.randomUUID().toString();
        int responseLen = responseContent.getBytes("utf-8").length;
        byte[]  responseContent2 = responseContent.getBytes("utf-8");
        //构建一个协议包
        MessageProtocol messageProtocol = new MessageProtocol();
        messageProtocol.setLen(responseLen);
        messageProtocol.setContent(responseContent2);
        ctx.writeAndFlush(messageProtocol);
    }
}
MyClient
package com.sevattal.netty.protocoltcp;
import io.netty.bootstrap.Bootstrap;
import io.netty.channel.ChannelFuture;
import io.netty.channel.EventLoopGroup;
import io.netty.channel.nio.NioEventLoopGroup;
import io.netty.channel.socket.nio.NioSocketChannel;
public class MyClient {
    public static void main(String[] args)  throws  Exception{
        EventLoopGroup group = new NioEventLoopGroup();
        try {
            Bootstrap bootstrap = new Bootstrap();
            bootstrap.group(group).channel(NioSocketChannel.class)
                    .handler(new MyClientInitializer()); //自定义一个初始化类
            ChannelFuture channelFuture = bootstrap.connect("localhost", 7000).sync();
            channelFuture.channel().closeFuture().sync();
        }finally {
            group.shutdownGracefully();
        }
    }
}
MyClientInitializer
package com.sevattal.netty.protocoltcp;
import io.netty.channel.ChannelInitializer;
import io.netty.channel.ChannelPipeline;
import io.netty.channel.socket.SocketChannel;
public class MyClientInitializer extends ChannelInitializer<SocketChannel> {
    @Override
    protected void initChannel(SocketChannel ch) throws Exception {
        ChannelPipeline pipeline = ch.pipeline();
        pipeline.addLast(new MyMessageEncoder()); //加入编码器
        pipeline.addLast(new MyMessageDecoder()); //加入解码器
        pipeline.addLast(new MyClientHandler());
    }
}
MyClientHandler
package com.sevattal.netty.protocoltcp;
import io.netty.buffer.ByteBuf;
import io.netty.buffer.Unpooled;
import io.netty.channel.ChannelHandlerContext;
import io.netty.channel.SimpleChannelInboundHandler;
import java.nio.charset.Charset;
public class MyClientHandler extends SimpleChannelInboundHandler<MessageProtocol> {
    private int count;
    @Override
    public void channelActive(ChannelHandlerContext ctx) throws Exception {
        //使用客户端发送10条数据 "今天天气冷,吃火锅" 编号
        for(int i = 0; i< 5; i++) {
            String mes = "今天天气冷,吃火锅";
            byte[] content = mes.getBytes(Charset.forName("utf-8"));
            int length = mes.getBytes(Charset.forName("utf-8")).length;
            //创建协议包对象
            MessageProtocol messageProtocol = new MessageProtocol();
            messageProtocol.setLen(length);
            messageProtocol.setContent(content);
            ctx.writeAndFlush(messageProtocol);
        }
    }
//    @Override
    protected void channelRead0(ChannelHandlerContext ctx, MessageProtocol msg) throws Exception {
        int len = msg.getLen();
        byte[] content = msg.getContent();
        System.out.println("客户端接收到消息如下");
        System.out.println("长度=" + len);
        System.out.println("内容=" + new String(content, Charset.forName("utf-8")));
        System.out.println("客户端接收消息数量=" + (++this.count));
    }
    @Override
    public void exceptionCaught(ChannelHandlerContext ctx, Throwable cause) throws Exception {
        System.out.println("异常消息=" + cause.getMessage());
        ctx.close();
    }
}
MyMessageDecoder
package com.sevattal.netty.protocoltcp;
import io.netty.buffer.ByteBuf;
import io.netty.channel.ChannelHandlerContext;
import io.netty.handler.codec.ReplayingDecoder;
import java.util.List;
public class MyMessageDecoder extends ReplayingDecoder<Void> {
    @Override
    protected void decode(ChannelHandlerContext ctx, ByteBuf in, List<Object> out) throws Exception {
        System.out.println();
        System.out.println();
        System.out.println("MyMessageDecoder decode 被调用");
        //需要将得到二进制字节码-> MessageProtocol 数据包(对象)
        int length = in.readInt();
        byte[] content = new byte[length];
        in.readBytes(content);
        //封装成 MessageProtocol 对象,放入 out, 传递下一个handler业务处理
        MessageProtocol messageProtocol = new MessageProtocol();
        messageProtocol.setLen(length);
        messageProtocol.setContent(content);
        //放入out传给下一个hanlder进行处理
        out.add(messageProtocol);
    }
}
MyMessageEncoder
package com.sevattal.netty.protocoltcp;
import io.netty.buffer.ByteBuf;
import io.netty.channel.ChannelHandlerContext;
import io.netty.handler.codec.MessageToByteEncoder;
public class MyMessageEncoder extends MessageToByteEncoder<MessageProtocol> {
    @Override
    protected void encode(ChannelHandlerContext ctx, MessageProtocol msg, ByteBuf out) throws Exception {
        System.out.println("MyMessageEncoder encode 方法被调用");
        out.writeInt(msg.getLen());
        out.writeBytes(msg.getContent());
    }
}
效果
Client输出
MyMessageEncoder encode 方法被调用
MyMessageEncoder encode 方法被调用
MyMessageEncoder encode 方法被调用
MyMessageEncoder encode 方法被调用
MyMessageEncoder encode 方法被调用
-------------------------------------
//下面是客户端开始一个一个的收到服务端的回复
MyMessageDecoder decode 被调用
客户端接收到消息如下
长度=36
内容=1b5286dd-0fc2-4f62-9bf7-d5fad84179b5
客户端接收消息数量=1
-------------------------------------
MyMessageDecoder decode 被调用
客户端接收到消息如下
长度=36
内容=653d18cb-ab72-4163-8b95-09c94ecac873
客户端接收消息数量=2
-------------------------------------
MyMessageDecoder decode 被调用
客户端接收到消息如下
长度=36
内容=3be6e403-91bb-4437-ada8-6cdb9eb7ef00
客户端接收消息数量=3
-------------------------------------
MyMessageDecoder decode 被调用
客户端接收到消息如下
长度=36
内容=94c8f306-fd9c-455a-956c-16698ce4150b
客户端接收消息数量=4
-------------------------------------
MyMessageDecoder decode 被调用
客户端接收到消息如下
长度=36
内容=7890de9c-0fa2-4317-8de1-1d464315fa1b
客户端接收消息数量=5
Server输出
MyMessageDecoder decode 被调用
服务器接收到信息如下
长度=27
内容=今天天气冷,吃火锅
服务器接收到消息包数量=1
服务端开始回复消息------
MyMessageEncoder encode 方法被调用
-------------------------------------
MyMessageDecoder decode 被调用
服务器接收到信息如下
长度=27
内容=今天天气冷,吃火锅
服务器接收到消息包数量=2
服务端开始回复消息------
MyMessageEncoder encode 方法被调用
-------------------------------------
MyMessageDecoder decode 被调用
服务器接收到信息如下
长度=27
内容=今天天气冷,吃火锅
服务器接收到消息包数量=3
服务端开始回复消息------
MyMessageEncoder encode 方法被调用
-------------------------------------
MyMessageDecoder decode 被调用
服务器接收到信息如下
长度=27
内容=今天天气冷,吃火锅
服务器接收到消息包数量=4
服务端开始回复消息------
MyMessageEncoder encode 方法被调用
-------------------------------------
MyMessageDecoder decode 被调用
服务器接收到信息如下
长度=27
内容=今天天气冷,吃火锅
服务器接收到消息包数量=5
服务端开始回复消息------
MyMessageEncoder encode 方法被调用
无论运行几次,Server都是分5次接收的,这样就解决了TCP粘包问题。
用 Netty 自己实现简单的RPC
RPC 基本介绍
1.RPC(Remote Procedure Call)—远程过程调用,是一个计算机通信协议。该协议允许运行于一台计算机的程序调用另一台计算机的子程序,而程序员无需额外地为这个交互作用编程
2.两个或多个应用程序都分布在不同的服务器上,它们之间的调用都像是本地方法调用一样(如图)
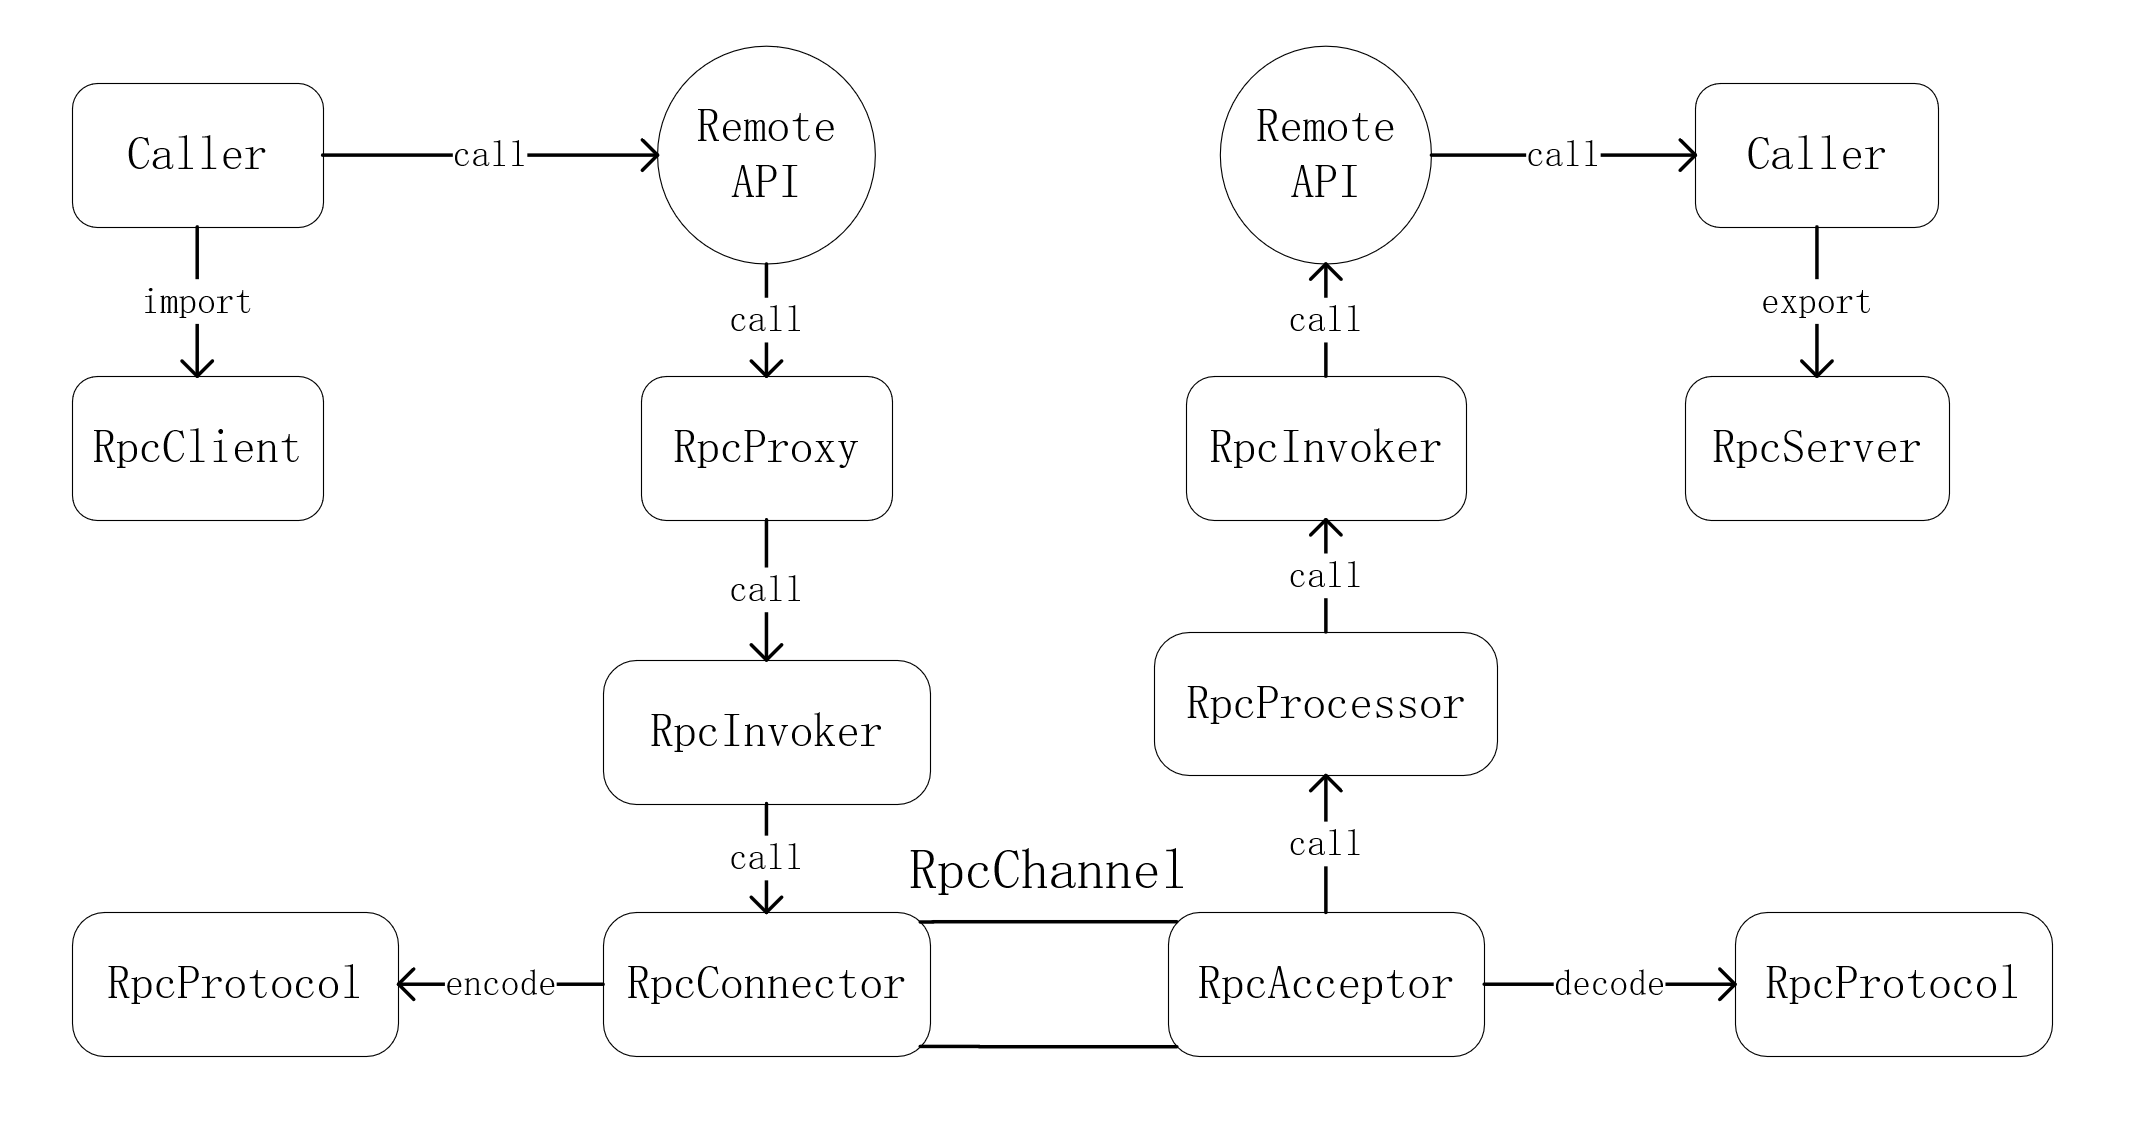
过程:
1.调用者(Caller),调用远程API(Remote API)
2.调用远程API会通过一个RPC代理(RpcProxy)
3.RPC代理再去调用RpcInvoker(这个是PRC的调用者)
4.RpcInvoker通过RPC连接器(RpcConnector)
5.RPC连接器用两台机器规定好的PRC协议(RpcProtocol)把数据进行编码
6.接着RPC连接器通过RpcChannel通道发送到对方的PRC接收器(RpcAcceptor)
7.PRC接收器通过PRC协议进行解码拿到数据
8.然后将数据传给RpcProcessor
9.RpcProcessor再传给RpcInvoker
10.RpcInvoker调用Remote API
11.最后推给被调用者(Callee)
12.常见的 RPC 框架有:比较知名的如阿里的 Dubbo、Google 的 gRPC、Go 语言的 rpcx、Apache 的 thrift,Spring 旗下的 SpringCloud。
我们的RPC 调用流程图
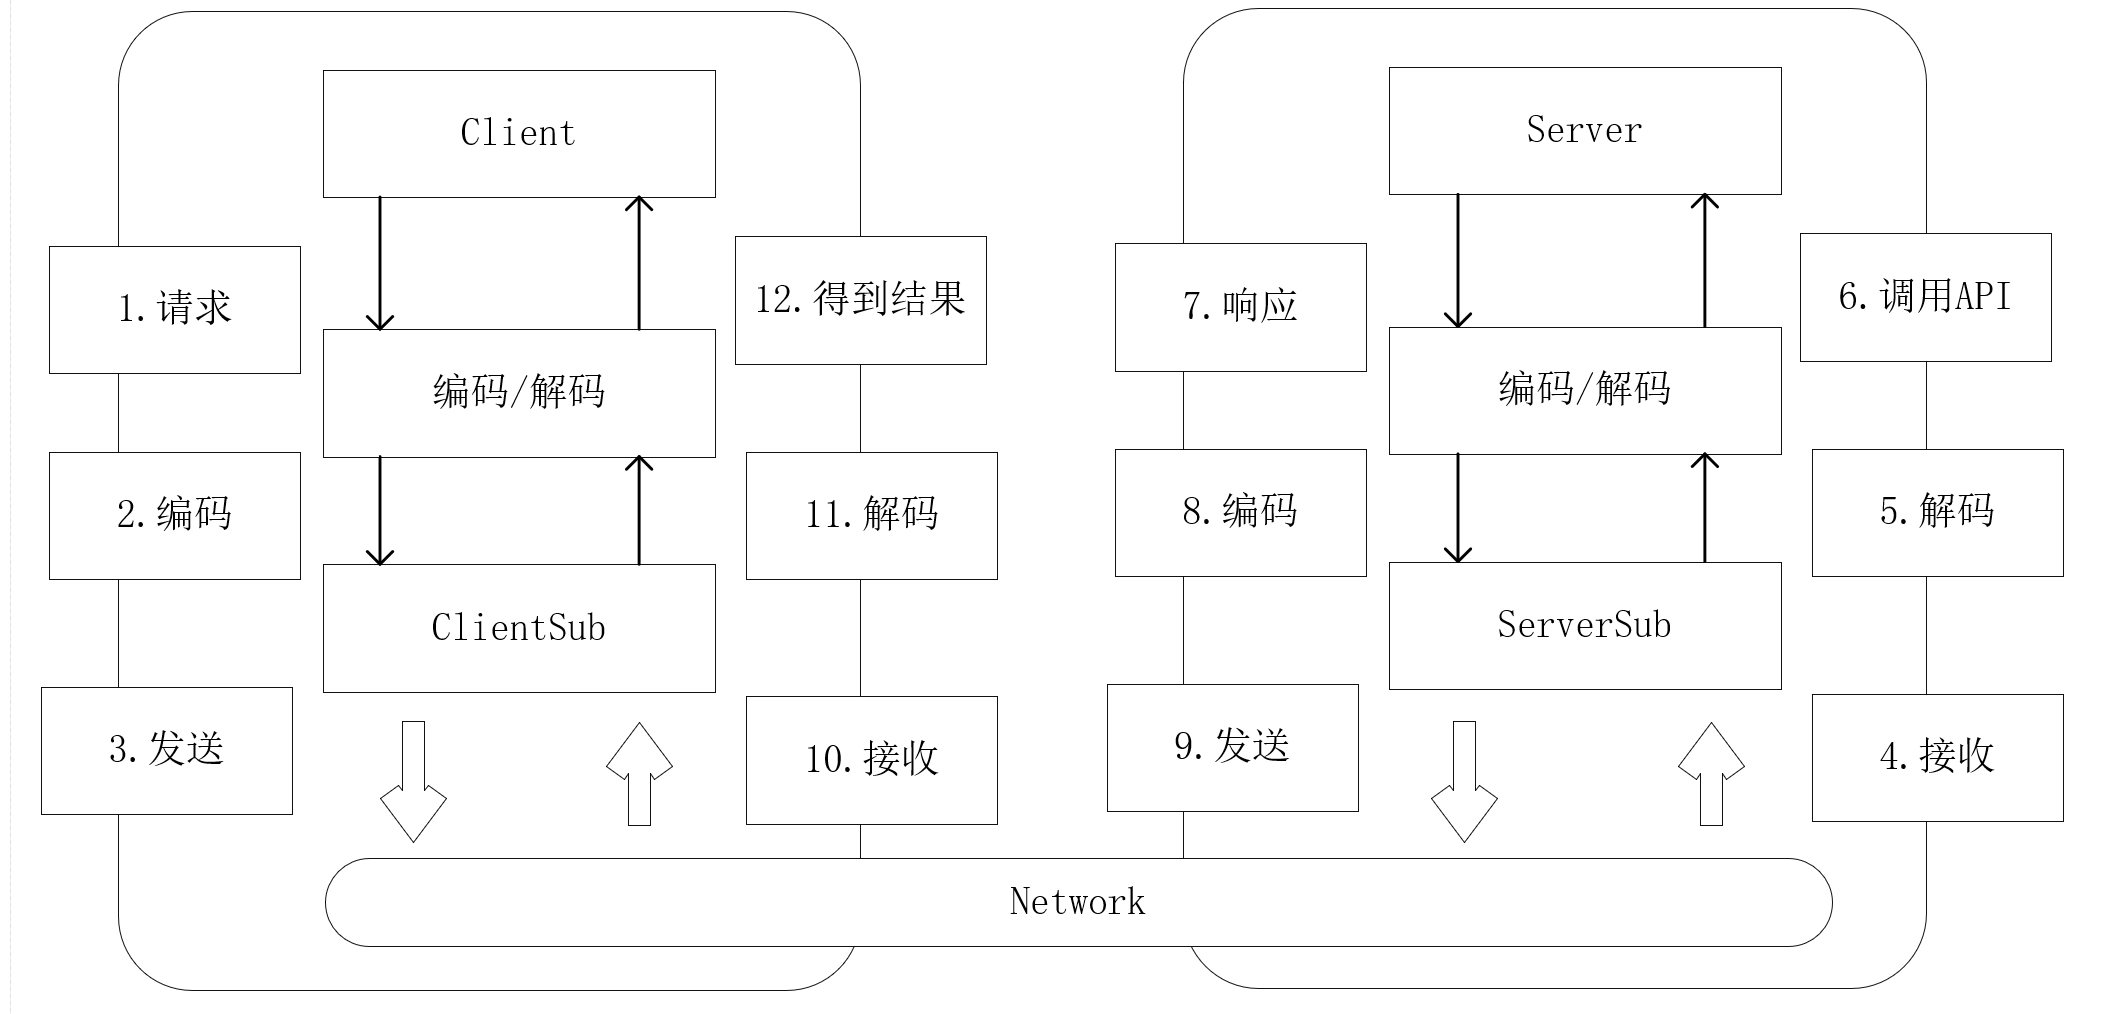
术语说明:在RPC中,Client叫服务消费者,Server叫服务提供者
RPC 调用流程说明
1.服务消费方(client)以本地调用方式调用服务
2.client stub 接收到调用后负责将方法、参数等封装成能够进行网络传输的消息体
3.client stub 将消息进行编码并发送到服务端
4.server stub 收到消息后进行解码
5.server stub 根据解码结果调用本地的服务
6.本地服务执行并将结果返回给 server stub
7.server stub 将返回导入结果进行编码并发送至消费方
8.client stub 接收到消息并进行解码
9.服务消费方(client)得到结果
小结:RPC 的目标就是将 2 - 8 这些步骤都封装起来,用户无需关心这些细节,可以像调用本地方法一样即可完成远程服务调用
己实现 Dubbo RPC(基于 Netty)
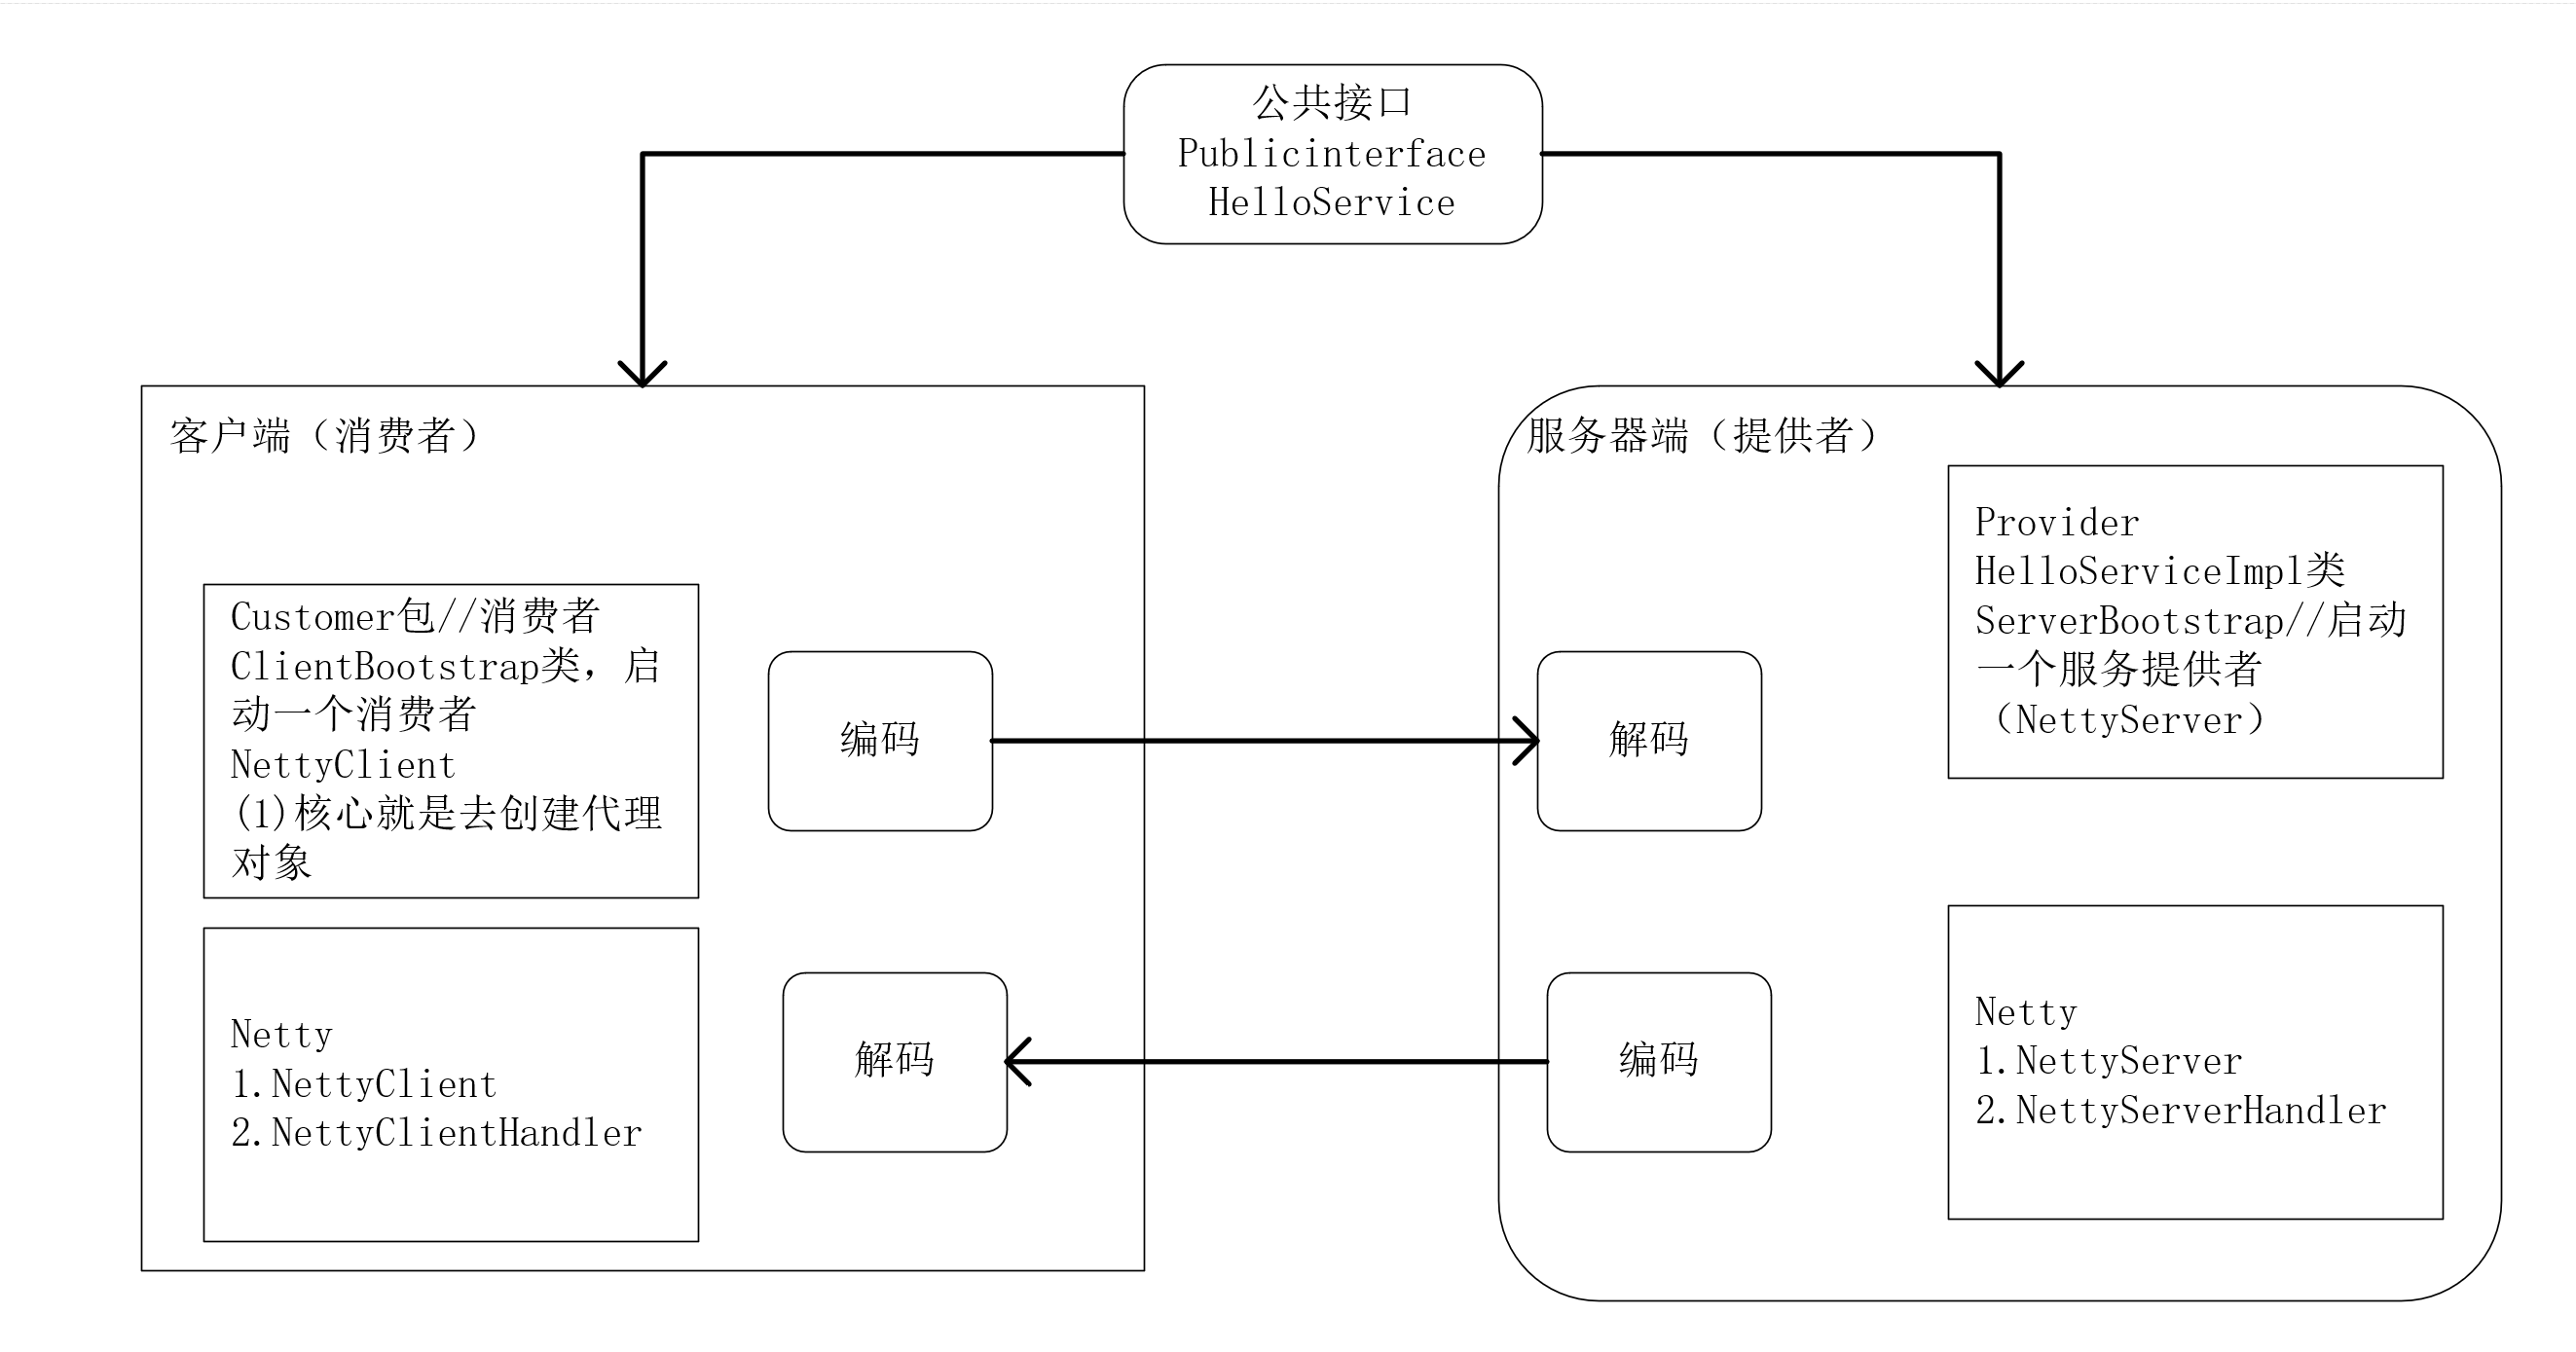
需求说明
1.Dubbo 底层使用了 Netty 作为网络通讯框架,要求用 Netty 实现一个简单的 RPC 框架
2.模仿 Dubbo,消费者和提供者约定接口和协议,消费者远程调用提供者的服务,提供者返回一个字符串,消费者打印提供者返回的数据。底层网络通信使用 Netty 4.1.20
设计说明
1.创建一个接口,定义抽象方法。用于消费者和提供者之间的约定。
2.创建一个提供者,该类需要监听消费者的请求,并按照约定返回数据。
3.创建一个消费者,该类需要透明的调用自己不存在的方法,内部需要使用 Netty 请求提供者返回数据
4.开发的分析图
代码
封装的RPC
可以把这块代码理解成封装的dubbo
NettyServer
package com.sevattal.netty.dubborpc.netty;
import io.netty.bootstrap.ServerBootstrap;
import io.netty.channel.ChannelFuture;
import io.netty.channel.ChannelInitializer;
import io.netty.channel.ChannelPipeline;
import io.netty.channel.EventLoopGroup;
import io.netty.channel.nio.NioEventLoopGroup;
import io.netty.channel.socket.SocketChannel;
import io.netty.channel.socket.nio.NioServerSocketChannel;
import io.netty.handler.codec.string.StringDecoder;
import io.netty.handler.codec.string.StringEncoder;
public class NettyServer {
    public static void startServer(String hostName, int port) {
        startServer0(hostName,port);
    }
    //编写一个方法,完成对NettyServer的初始化和启动
    private static void startServer0(String hostname, int port) {
        EventLoopGroup bossGroup = new NioEventLoopGroup(1);
        EventLoopGroup workerGroup = new NioEventLoopGroup();
        try {
            ServerBootstrap serverBootstrap = new ServerBootstrap();
            serverBootstrap.group(bossGroup,workerGroup)
                    .channel(NioServerSocketChannel.class)
                    .childHandler(new ChannelInitializer<SocketChannel>() {
                                      @Override
                                      protected void initChannel(SocketChannel ch) throws Exception {
                                          ChannelPipeline pipeline = ch.pipeline();
                                          pipeline.addLast(new StringDecoder());
                                          pipeline.addLast(new StringEncoder());
                                          pipeline.addLast(new NettyServerHandler()); //业务处理器
                                      }
                                  }
                    );
            ChannelFuture channelFuture = serverBootstrap.bind(hostname, port).sync();
            System.out.println("服务提供方开始提供服务~~");
            channelFuture.channel().closeFuture().sync();
        }catch (Exception e) {
            e.printStackTrace();
        }
        finally {
            bossGroup.shutdownGracefully();
            workerGroup.shutdownGracefully();
        }
    }
}
NettyServerHandler
package com.sevattal.netty.dubborpc.netty;
import com.sevattal.netty.dubborpc.customer.ClientBootstrap;
import com.sevattal.netty.dubborpc.provider.HelloServiceImpl;
import io.netty.channel.ChannelHandlerContext;
import io.netty.channel.ChannelInboundHandlerAdapter;
//服务器这边handler比较简单
public class NettyServerHandler extends ChannelInboundHandlerAdapter {
    @Override
    public void channelRead(ChannelHandlerContext ctx, Object msg) throws Exception {
        System.out.println("---服务端开始收到来自客户单的消息---");
        //获取客户端发送的消息,并调用服务
        System.out.println("原始消息:" + msg);
        /*
         1.客户端在调用服务器的api 时,我们需要定义一个协议,比如我们要求 每次发消息是都
         必须以某个字符串开头 "HelloService#hello#你好"
         2.Dubbo注册在Zookeeper里时,这种就是类的全路径字符串,你用IDEA的zookeeper插件
         就可以清楚地看到
         */
        if(msg.toString().startsWith(ClientBootstrap.providerName)) {
            String result = new HelloServiceImpl().hello(msg.toString().substring(msg.toString().lastIndexOf("#") + 1));
            ctx.writeAndFlush(result);
        }
    }
    @Override
    public void exceptionCaught(ChannelHandlerContext ctx, Throwable cause) throws Exception {
        ctx.close();
    }
}
NettyClientHandler
package com.sevattal.netty.dubborpc.netty;
import io.netty.channel.ChannelHandlerContext;
import io.netty.channel.ChannelInboundHandlerAdapter;
import java.util.concurrent.Callable;
public class NettyClientHandler extends ChannelInboundHandlerAdapter implements Callable {
    private ChannelHandlerContext context;//上下文
    private String result; //返回的结果
    private String para; //客户端调用方法时,传入的参数
    //与服务器的连接创建后,就会被调用, 这个方法是第一个被调用(1)
    @Override
    public void channelActive(ChannelHandlerContext ctx) throws Exception {
        System.out.println(" channelActive 被调用  ");
        context = ctx; //因为我们在其它方法会使用到 ctx
    }
    //收到服务器的数据后,调用方法 (4)
    //
    @Override
    public synchronized void channelRead(ChannelHandlerContext ctx, Object msg) throws Exception {
        System.out.println(" channelRead 被调用  ");
        result = msg.toString();
        notify(); //唤醒等待的线程
    }
    @Override
    public void exceptionCaught(ChannelHandlerContext ctx, Throwable cause) throws Exception {
        ctx.close();
    }
    //被代理对象调用, 发送数据给服务器,-> wait -> 等待被唤醒(channelRead) -> 返回结果 (3)-》5
    @Override
    public synchronized Object call() throws Exception {
        System.out.println(" call1 被调用  ");
        context.writeAndFlush(para);
        //进行wait
        wait(); //等待channelRead 方法获取到服务器的结果后,唤醒
        System.out.println(" call2 被调用  ");
        return  result; //服务方返回的结果
    }
    //(2)
    void setPara(String para) {
        System.out.println(" setPara  ");
        this.para = para;
    }
}
NettyClient
package com.sevattal.netty.dubborpc.netty;
import io.netty.bootstrap.Bootstrap;
import io.netty.channel.ChannelInitializer;
import io.netty.channel.ChannelOption;
import io.netty.channel.ChannelPipeline;
import io.netty.channel.nio.NioEventLoopGroup;
import io.netty.channel.socket.SocketChannel;
import io.netty.channel.socket.nio.NioSocketChannel;
import io.netty.handler.codec.string.StringDecoder;
import io.netty.handler.codec.string.StringEncoder;
import java.lang.reflect.Proxy;
import java.util.concurrent.Executor;
import java.util.concurrent.ExecutorService;
import java.util.concurrent.Executors;
public class NettyClient {
    //创建线程池
    private static ExecutorService executor = Executors.newFixedThreadPool(Runtime.getRuntime().availableProcessors());
    private static NettyClientHandler client;
    private int count = 0;
    //编写方法使用代理模式,获取一个代理对象
    public Object getBean(final Class<?> serivceClass, final String providerName) {
        return Proxy.newProxyInstance(Thread.currentThread().getContextClassLoader(),
                new Class<?>[]{serivceClass}, (proxy, method, args) -> {
                    System.out.println("(proxy, method, args) 进入...." + (++count) + " 次");
                    //{}  部分的代码,客户端每调用一次 hello, 就会进入到该代码
                    if (client == null) {
                        initClient();
                    }
                    //设置要发给服务器端的信息
                    //providerName:协议头,args[0]:就是客户端要发送给服务端的数据
                    client.setPara(providerName + args[0]);
                    //
                    return executor.submit(client).get();
                });
    }
    //初始化客户端
    private static void initClient() {
        client = new NettyClientHandler();
        //创建EventLoopGroup
        NioEventLoopGroup group = new NioEventLoopGroup();
        Bootstrap bootstrap = new Bootstrap();
        bootstrap.group(group)
                .channel(NioSocketChannel.class)
                .option(ChannelOption.TCP_NODELAY, true)
                .handler(
                        new ChannelInitializer<SocketChannel>() {
                            @Override
                            protected void initChannel(SocketChannel ch) throws Exception {
                                ChannelPipeline pipeline = ch.pipeline();
                                pipeline.addLast(new StringDecoder());
                                pipeline.addLast(new StringEncoder());
                                pipeline.addLast(client);
                            }
                        }
                );
        try {
            bootstrap.connect("127.0.0.1", 7000).sync();
        } catch (Exception e) {
            e.printStackTrace();
        }
    }
}
接口
package com.sevattal.netty.dubborpc.publicinterface;
//这个是接口,是服务提供方和 服务消费方都需要
public interface HelloService {
    String hello(String mes);
}
服务端(provider)
HelloServiceImpl
package com.sevattal.netty.dubborpc.provider;
import com.sevattal.netty.dubborpc.publicinterface.HelloService;
public class HelloServiceImpl implements HelloService{
    private static int count = 0;
    //当有消费方调用该方法时, 就返回一个结果
    @Override
    public String hello(String mes) {
        System.out.println("收到客户端消息=" + mes);
        System.out.println();
        //根据mes 返回不同的结果
        if(mes != null) {
            return "你好客户端, 我已经收到你的消息。消息为:[" + mes + "] ,第" + (++count) + " 次 \n";
        } else {
            return "你好客户端, 我已经收到你的消息 ";
        }
    }
}
ServerBootstrap
package com.sevattal.netty.dubborpc.provider;
import com.sevattal.netty.dubborpc.netty.NettyServer;
//ServerBootstrap 会启动一个服务提供者,就是 NettyServer
public class ServerBootstrap {
    public static void main(String[] args) {
        //代码代填..
        NettyServer.startServer("127.0.0.1", 7000);
    }
}
客户端(消费者)
package com.sevattal.netty.dubborpc.customer;
import com.sevattal.netty.dubborpc.netty.NettyClient;
import com.sevattal.netty.dubborpc.publicinterface.HelloService;
public class ClientBootstrap {
    //这里定义协议头
    public static final String providerName = "HelloService#hello#";
    public static void main(String[] args) throws  Exception{
        //创建一个消费者
        NettyClient customer = new NettyClient();
        //创建代理对象
        HelloService service = (HelloService) customer.getBean(HelloService.class, providerName);
        for (;; ) {
            Thread.sleep(2 * 1000);
            //通过代理对象调用服务提供者的方法(服务)
            String res = service.hello("你好 dubbo~");
            System.out.println("调用的结果 res= " + res);
        }
    }
}
调用过程
1.ClientBootstrap#main发起调用
2.走到下面这一行代码后
HelloService service = (HelloService) customer.getBean(HelloService.class, providerName);
3.调用NettyClient#getBean,在此方法里与服务端建立链接。
4.于是就执行NettyClientHandler#channelActive
5.接着回到NettyClient#getBean调用NettyClientHandler#setPara,调用完之后再回到NettyClient#getBean,用线程池提交任务
6.因为用线程池提交了任务,就准备执行NettyClientHandler#call线程任务
7.在NettyClientHandler#call中发送数据给服务提供者
context.writeAndFlush(para);
由于还没收到服务提供者的数据结果,所以wait住
8.来到了服务提供者这边,从Socket通道中收到了数据,所以执行NettyServerHandler#channelRead,然后因为此方法中执行了
String result = new HelloServiceImpl().hello(msg.toString().substring(msg.toString().lastIndexOf("#") + 1));
9.就去HelloServiceImpl#hello中执行业务逻辑,返回数据给NettyServerHandler#channelRead,NettyServerHandler#channelRead再把数据发给客户端
10.NettyClientHandler#channelRead收到服务提供者发来的数据,唤醒之前wait的线程
11.所以之前wait的线程从NettyClientHandler#call苏醒,返回result给NettyClient#getBean
12.NettyClient#getBeanget()到数据,ClientBootstrap#main中的此函数调用返回,得到服务端提供的数据。
String res = service.hello("你好 dubbo~");
13.至此,一次RPC调用结束。
效果
ClientBootstrap打印
(proxy, method, args) 进入....1 次
setPara
channelActive 被调用
call1 被调用
channelRead 被调用
call2 被调用
调用的结果 res= 你好客户端, 我已经收到你的消息。消息为:[你好 dubbo~] ,第1 次
---------------------------------------
(proxy, method, args) 进入....2 次
setPara
call1 被调用
channelRead 被调用
call2 被调用
调用的结果 res= 你好客户端, 我已经收到你的消息。消息为:[你好 dubbo~] ,第2 次
---------------------------------------
(proxy, method, args) 进入....3 次
setPara
call1 被调用
channelRead 被调用
call2 被调用
调用的结果 res= 你好客户端, 我已经收到你的消息。消息为:[你好 dubbo~] ,第3 次
---------------------------------------
(proxy, method, args) 进入....4 次
setPara
call1 被调用
channelRead 被调用
call2 被调用
调用的结果 res= 你好客户端, 我已经收到你的消息。消息为:[你好 dubbo~] ,第4 次
---------------------------------------
(proxy, method, args) 进入....5 次
setPara
call1 被调用
channelRead 被调用
call2 被调用
调用的结果 res= 你好客户端, 我已经收到你的消息。消息为:[你好 dubbo~] ,第5 次
---------------------------------------
ServerBootstrap打印
服务提供方开始提供服务~~
---服务端开始收到来自客户单的消息---
原始消息:HelloService#hello#你好 dubbo~
收到客户端消息=你好 dubbo~
---------------------------------------
---服务端开始收到来自客户单的消息---
原始消息:HelloService#hello#你好 dubbo~
收到客户端消息=你好 dubbo~
---------------------------------------
---服务端开始收到来自客户单的消息---
原始消息:HelloService#hello#你好 dubbo~
收到客户端消息=你好 dubbo~
---------------------------------------
---服务端开始收到来自客户单的消息---
原始消息:HelloService#hello#你好 dubbo~
收到客户端消息=你好 dubbo~
---------------------------------------
---服务端开始收到来自客户单的消息---
原始消息:HelloService#hello#你好 dubbo~
收到客户端消息=你好 dubbo~